How Much Protein You Need and

Pro Bodybuilders eat about one gram (sometimes even 1.5 grams) of protein per pound of body weight or per pound of non-fat tissue. I'm sure you've seen that the recommended dail

Comments

Showing posts with label knee pain. Show all posts

Friday, May 29, 2015

Friday Q&A: Opening Your Hips without Knee Pain

Q: I have a question about hip openers. I teach to mostly middle-aged and older populations. Some folks are more physically active than others, but almost all of them spend a lot of time sitting, either in a car or at a desk. Many of them experience tightness in the hips and a smaller sub-set also have issues with painful knees - arthritis, meniscus issues, etc. I was taught that externally rotating the leg can be problematic for the knees, especially if they are already vulnerable. However it seems as though most of the best and most direct hip openers involve external rotation. Do you know of any postures that effectively stretch and release tension in the gluteals and the external rotators of the hip without compromising the safety of the knee?

I searched the blog but wasn't able to find anything that addressed this issue, though perhaps I didn't search effectively. I'd be grateful for any insights you can share, from previous posts, or in the future.

A: Thanks for this question! I want to begin by reminding all of us that in yoga circles “hip opening” sometimes gets reduced to the combination of hip flexion, abduction and external rotation of the femur bone (thigh bone) in the hip socket, as in Cobbler’s pose (Baddha Konasana) and Lotus pose (Padmasana). But the hip obviously moves in many other directions, so “hip opening” should reflect the improvement of the full range of motion of the hip joint! So, in general, for yourself and your students, focus on good overall hip opening, which will have positive impacts on posture, locomotion, balance, and agility.

Opening the Front of the Hip Joint

To open the front of the joint—the area your sedentary and seated students need mostly—you want to stretch the front thigh muscles, such as the quads and the psoas by extended the joint, so High Lunge (Vanarasana), including the classic and chair versions, and the Dropped-Knee Lunge, and Warrior 1 (Virabradrasana 1) for the back leg can effectively work those areas. 


Opening the Inner Hip Joint

To open the inner aspect of the joint, you want to lengthen the adductor group of muscles via poses that take your legs wide apart, such as Standing Wide-Legged Forward Bend (Prasarita Padottanasana), Pyramid pose (Parsvottanasana), Triangle pose (Trikonasana) and Extended Side Angle pose (Utthita Parsvakonasana), and Wide-Angle Seated pose (Upavista Konasana).
Opening the Outer Hip Joint 

To open the outer hip joint, you want to adduct the hip joint via poses that bring your leg across the midline of your body. You can do this movement with Reclined Leg Stretch (Supta Padangusthasana), bringing your lifted leg across the midline.
Standing Forward Bend (Uttanasana) with one leg crossed in front of the other can also be helpful. 

Opening the Back of the Hip Joint

To open the back of the joint, stretching the hamstring stretch muscles by flexing the joint with straight legs is very helpful. Some poses that stretch the hamstrings effectively include Standing Forward Bend (Uttanasana), Reclined Leg Stretch Pose (Supta Padangusthasana) Version 1, and Pyramid pose (Parsvottanasana). 
Combinations of Movements

To address combinations of movements, especially those that include external rotation of the hip joint, which is necessary for poses like Cobbler’s and Lotus poses, Thread the Needle pose is a great way to release tension in the deep external rotators of the hips.
If you hold onto the top shin and stretch your bottom leg along the floor, you are essentially doing upside down Pigeon pose without as much potential strain on the knee joint for you folks with knee issues. Sorry I don’t yet have a picture of this variation! 

In fact, regular Pigeon pose (Kapotasana) is one to avoid for those with knee issues, as it tends to put too much pressure into the front bent knee, especially when doing the forward folding version.

You can also get a nice stretch of the posterior gluteal muscles in all your Downward-Facing Dog (Adho Mukha Svanasana) variations, even Half Downward-Facing Dog at the Wall
If you then bend your left knee a bit toward the wall and press your hips a bit to the right side of your mat while keeping your right knee straight, you can get a deeper stretch of the lateral gluteal muscles and the deep external rotators of the right hip. And it is easy on the knees! Of course, do it on both sides!

Also, the twisting version of Reclined Leg Stretch pose pictured above is also a good one, as are these versions of Marichyasana 3:
 If there is any knee pain when you try this one, you can move your bent knee foot slightly away from the hips. 

All this should keep you and your students busy for a while!

—Baxter

Subscribe to Yoga for Healthy Aging by Email ° Follow Yoga for Healthy Aging on Facebook ° Join this site with Google Friend Connect

Friday, November 15, 2013

Friday Q&A: Pain After a Knee Replacement, Part 2

This week’s question is a follow-up question that came in after the post we did on yoga and knee replacements (see Knee Replacements and Yoga) and Shari's answer to another reader about pain after a total knee replacement (see Friday Q&A: Pain After a Total Knee Replacement). It seems that pain isn't uncommon after a knee replacement, but in this case, the pain is coming several years after the replacement:

Q: My partial knee replacement was April 2007. I started back to Yoga this past summer-one day a week, but I found child pose with the knees wide uncomfortable, but I did do it for a few weeks this fall. I now have some pain in my knee and I'm hoping that I haven’t loosed the cement in the joint. Any help would be appreciated.

A: Thanks for writing in about this new pain in your knee. As always, I am not able to diagnose or prescribe a yoga program for you without first doing a more detailed history and physical exam in person, but I can share some thoughts that come to mind from the situation you find yourself in.

One of the challenging things to discern for new yoga students, or those returning after a long break from doing yoga is: How to gauge if “uncomfortable” is a potentially harmful warning sign from your body? This is tricky, because it may simply be that you are getting some intense sensation feedback from the body as you stretch and strengthen parts of your body that have been neglected for a long time. With the knees in particular, learning to recognize the difference between the healthy stretch sensation of the muscles and connective tissue lengthening versus the compression of the tissues and bones that often happens deep folds of the knee joints is an important skill to cultivate. The compression sensations can sometimes indicate pinching of tissues that could lead to inflammation, injury or bruising that may not resolve quickly or could lead to more chronic pain. It is sometimes hard to skip these poses—like Child’s pose—in a public class since they are so common unless you have an alternative offered by your teacher.  I often suggest that folks with knee pain flip onto their backs and draw the knees to the chest, essentially an upside down Child’s pose. Then almost all the pressure is off the knee joint and usually no pain is felt. The other thing to try is to vary the distance of the knee spread in regular Child’s pose until you find a distance that does feel uncomfortable.

It is also important to recognize that undergoing a knee replacement does not equal having the same healthy knee anatomy and movement you had before the surgery and the underlying knee problem that lead to your surgery. One of my students who had knee surgery to clean out a lot of arthritis damage to his cartilage found that his range of motion was less after the surgery than before, but he was now pain free. His challenge became how to gradually see if he could improve the range of motion without leading to recurrent pain.And another student of mine who had one knee replaced, but also had a second bad knee, found that although the new knee operated normally, the second knee become more painful secondary to the new way he was walking with essentially two very different knees. And sadly, having a successful repair does not guarantee that future dysfunction and pain will not arise.

In this case, it is also important to recognize the effect of the passage of time on both the surgerized knee and your other knee. A substantial amount of time has passed from 2007 until this summer of 2013. And with that the knees can undergo gradual changes in the architecture and function of the joint, such that the repaired knee can undergo undesirable changes, and unrelated changes could also have taken place. It could be that something has loosened in the replaced knee parts, but it could just a likely be some other structure, tendon, muscle or other structure, that could be the source of this new pain. This needs investigating! 

Until you have an exam and get a diagnosis from your orthopedic MD, avoid the positions that create immediate or delayed pain in the affected knee. Poses like Child’s pose include Hero pose, Thunderbolt pose (as well as poses that have just one leg in the deep flexion fold at the knee joint), front knee in Pigeon pose variations, the front knee in deep drop knee lunges, and any Lotus preps or full and half Lotus pose. Even some simple seated poses like Sukasana (Seated Crossed Legs) can be worth avoiding until you know what you have going on. Once you get a clear picture of what is happening, I’d suggest setting up a private session with an experienced yoga teacher or yoga therapist to design a home practice that can address your unique situation.

—Baxter

Friday, September 7, 2012

Friday Q&A: Knee Restrictions

Q: I have chondromalacia from an untreated sprained knee that I got 5 years, at 2 months post partum. Once I finally had it diagnosed, I needed nearly a year of physio for my knee to become 95% functional. So today, I cannot hyperflex, or sit on my knees, or go on all fours. Because I am very interested in practicing yoga now, I need to adapt several poses. Some impossible positions for me are the child's pose, the lotus, and anything stemming from those poses. I wonder if you have any advice to offer regarding adaptation as I follow videos and don't attend a formal yoga class. Many, many grateful thanks to you for your help!

A: Thanks for your very interesting question. Since chondromalacia of the knees is a fairly common condition, especially for younger women, I am excited to talk a bit about the condition and then share some general ways of modifying your poses to enjoy the bigger benefits of yoga while keeping that knee happy!

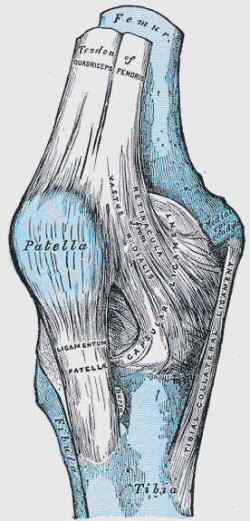
So let’s start off by defining chondromalacia, or what is also known as patellofemoral syndrome (PFS). The NIH website defines it as follows: “Chondromalacia of the patella —the softening and breakdown of the tissue (cartilage) on the underside of the kneecap (patella). The pain associated with this condition is often felt at the front of the knee or kneecap (patella).” Another common cause of pain in this area of the knee is runner’s knee or patellar tendonitis. Because chondromalacia involves actual breakdown of the healthy cartilage that lines the back surface of the knee cap, recovery times, as you have experienced, could be a lot longer than those for inflammation of the patellar tendon, which connects the quadraceps muscle to the front shin bone, via the knee cap.  Runner’s knee usually refers to the section of tendon between the patella and the tibia or anterior shinbone.

It is always helpful to have a sense of how this could come about. Normally, the kneecap sits in front of the lowest part of the upper leg bone, the remur bone, when you leg is straight at the knee joint. Once you bend or flex the knee to 90 degrees and beyond, the kneecap ends up in front of the bottom of the femur bone. The patella has a midline raised grove on its backside like the hull of a sail boat, and the bottom of the femur bone has a groove in it that the patella normally slides on, like a perfect channel for the bottom of the boat. Both surfaces of these bones are normally coated with smooth, slick, cushioning cartilage, so movement proceeds smoothly, silently and without much of any sensation. So how do things go wrong?  Again, according to the NIH:

“Anterior knee pain (such as PFS) begins when the kneecap does not move properly and rubs against the lower part of the thigh bone. This may occur because:
  • The kneecap is in an abnormal position (also called poor alignment of the patellofemoral joint)
  • There is tightness or weakness of the muscles on the front and back of your thigh
  • You are doing too much activity that places extra stress on the kneecap (such as running, jumping or twisting, skiing, or playing soccer)
  • You have flat feet”
Because deep bending of the knee joint brings the kneecap and the thighbone into close tighter proximity of one another, inflammation and pain can ensue when PFS is present. So, it is not surprising that you experience pain (I am assuming that is why you are avoiding these poses) in poses like Child’s pose, where not only are you deeply flexing the joint, but you are also putting your full body weight right over that knee. And Lotus involves not only deep flexion of the knee, but also a spinning outward of the shin bone in order to get your foot on you opposite thigh, adding another 3D challenge to an already sensitive joint.

In general, I’d recommend avoiding the deep fold of the knees in poses like Child’s pose and Hero pose (Virasana). One way to do Child’s pose is just flip it upside down, lying on your back, with your hands behind the knee joint to encourage a bit of space in the joint.  For Hero pose, a block on its highest height under your hips could relieve the intensity of the fold and allow for a modified version. Instead of Lotus pose, substitute Cobblers pose (Baddha Konasana), where you can keep your feet further away from your pubic bone and control how deep of a fold of your knees you can do without precipitating pain.

For straight leg standing poses, like Triangle, if it is the knee of the front leg where you experience pain if the knee hyper extends, then there are ways to train yourself to find more even alignment of the femur and lower leg bones, so you can still practice the standing poses with out aggravating your knee.  One use of props that some find helpful is to angle a block just behind your front shin so that it pushes up and forward against the back of your calf at just the point your knee would be going to far toward hyperextension.  It takes some playing around to find just the right spot for the block, but it can start to train your joint receptors to tell you where straight is. Once you know that spot or alignment, you can take the block away.

An experienced yoga teacher could also share many ways to modify poses so you could begin to feel more competent in caring for yourself with the basic yoga postures, and eventually could set the stage for you feeling safe to try a regular class. And always keep in mind that accomplishing challenging yoga poses is not really the goal of yoga, and that you always want to create a practice that serves your bigger goals, such as mental equanimity and clarity, while honoring the unique challenges that each of our body’s will continue to dish up.

—Baxter

Tuesday, June 5, 2012

Happy, Healthy Knees!

by Baxter

Since we started this blog in September, we have covered quite a bit of territory. Yet when I went back to look through our archives today, I was surprised that I had not dedicated a post to the subject of our knees! Our knees are one of the body’s most amazing architectural feats, allowing us to stand upright each morning, walk, run, jump and participate in life’s many and varied activities. And at the same time, the human knee, by virtue of the immense loads and stresses it endures each day, is also subject to the slow wear and tear of aging as well as the sudden vulnerability to injury, which many of us have encountered in our lives.

My own knees have allowed me to run races, bike long distances, climb mountains and hike incredible valleys, play basketball, baseball, tennis and a myriad other sports over the years, and for the most part have done a commendable job. But I have also suffered periodic flares of pain and swelling, especially in my left knee, stemming from an initial twisting incident on an icy ski run back in my thirties. X-rays show evidence of narrowing of the medial side of the joint, which implies I may have done some damage to the medial meniscus, the spongy cartilage pad designed to cushion the femur and tibia bones as they stack one on the other. And I have a family history of arthritis in hips and knees on my mom’s side of the family. Mom had both knees replaced in her seventies.
Yoga, especially hatha yoga, with its contemporary emphasis on yoga postures, can be both a blessing and a possible curse to your knees. As always, a mindful approach to your practice will help you tip the scales towards the blessing side. In fact, I have found that patient attention to my yoga poses following a flare of knee pain that was unrelated to my yoga practice allowed me to gradually calm and resolve the pain, and reclaim my full range of motion of the joint.

There’s a lot we could say about knees, but today I just want to start out our exploration of knees by considering how your yoga practice can ensure healthier, happier knees for you, especially for the athletes out there who enjoy running and biking. Although the stresses and demands on knees differ with the two activities, yoga’s dual benefits of strengthening and stretching around knee joint can prove helpful for both activities. In addition, the more essential skill of increased concentration and overall mindful awareness that yoga fosters can improve performance and reduce the likelihood of injury while enjoying these sports. And in the unfortunate circumstance of injury resulting from running and biking, yoga can be a part of your rehab program to get you back in action in a timely fashion. On top of all that, a well-rounded, balanced yoga practice can address issues above and below the knees, in the ankles and feet as well as hips and lower back, which can have significant impact on effective running and biking.

A few of my favorite poses and practices for runners and cyclists with a focus on the knee joint include Dynamic Reclined Hip Stretches (see here), Reclined Leg Stretch pose (Supta Padangusthasana), and Sun Salutations, as well as standing poses such as Warrior 1 pose, Triangle pose, Extended Side Angle pose, and Standing Forward Bend. For runners, I like to throw in psoas muscle stretches, such as drop knee lunges and Half Frog pose, from which cyclists can get some benefit as well. For cyclists, due to the tendency to have the spine in forward flexion (rounding forward), I recommend a passive backbend over a roll or block.

In future posts on the knees, I will discuss yoga for arthritis of the knees, as well as how to address certain injuries that can arise in this essential joint! In the meantime, I’m teaching two workshops that may be of interest to those concerned about their knees. In Oakland, I’ll be teaching a workshop at Mountain Yoga called “Knees if you Please,” on Saturday, June 9, from 2 to 5 (see Mountain Yoga for more information). And in Cincinnati, Ohio, I’ll be teaching a workshop at The Yoga Bar for runners and cyclists Saturday,  June 16, from 1 to 3 (see The Yoga Bar for more information).

Subscribe to YOGA FOR HEALTHY AGING by Email ° Follow Yoga for Healthy Aging on Facebook 

Wednesday, January 4, 2012

Featured Pose: Reclined Leg Stretch Sequence

by Baxter and Nina

The Reclined Leg Stretch sequence (Supta Padangusthasana) opens your hips and stretches the backs of your legs. It’s a perfect starting pose for just about any practice, as we usually like to start low (on the ground, that is!) and work up to standing poses. But it also works as a great standalone mini practice, providing relief for lower back pain or release of leg muscle tension due to sitting, traveling, or walking. And if you tend to store stress in your body, it’s also a great anti-stress pose after any stressful event or simply at the end of your work day.

The three variations of the pose take you first through forward folding at your hip joint, then, with your top leg out to the side, abduction of the femur, and finally, with your leg across the midline of your body, into a twist, adduction of the femur and rotation of the lower vertebrae of the spine, so you get overall opening of your hips and some twisting, too.

Baxter prescribes this pose for:
  • any musculoskeletal conditions that result in tightness in the hamstrings, hips and lower back
  • chronic back pain
  • general knee conditioning
  • stress relief
Instructions: Start by making a loop with the strap and have it ready off to your right side.
Now recline on your back, bend your right knee into your chest, place the loop over the arch of your right foot and straighten your leg toward the sky. Adjust the size of the loop so your arms can be comfortably straight. Press from both your hips to your heels. Stay in this version one for 14-16 breaths.

For the next variation, keep your bottom leg engaged and take the loop into your right hand and extend your left arm out to the side. Now slowly take your right leg out to the right side of the room until your foot is about 12 inches off the floor. If this feels painful or like too much effort is required to hold your leg in position, place a block or folded blanket under your right thigh for support. Stay for 14-16 breaths and on a exhale return to your leg to vertical.
Finally, take the loop into your left hand and extend your right arm out to the side. Then take your right leg across the midline of your body and over to your left side about 6-12 inches, keeping your lower back and pelvis on the floor.
Stay for 14-16 breaths, then release out of the pose, returning to a symmetrical position, either with legs straight or both knees bent, feet resting on the floor. Take a few moments to feel your body, and then repeat the series on your left side.

Cautions: Don’t pull your top leg aggressively toward your chest (although you can encourage it in that direction) as this could result in a strain to the origin of your hamstrings at your sitting bone, as well as aggravating a lower back condition if your lower back ends up flattening too firmly into the floor.

If you have weak wrists and fingers, you may need to modify the strap by making a loop and hooking your fingers over the loop to hold onto the strap—this makes it much gentler and easier for fingers and wrists.

Subscribe to YOGA FOR HEALTHY AGING by Email ° Follow Yoga for Healthy Aging on Facebook