How Much Protein You Need and

Pro Bodybuilders eat about one gram (sometimes even 1.5 grams) of protein per pound of body weight or per pound of non-fat tissue. I'm sure you've seen that the recommended dail

Comments

Saturday, March 5, 2016

3 most effective ways how to increase weight fast

How to increase weight fast is one of the main problems that pari passu with losing it disturbs many people because everybody wants to be attractive and have a nice shape. That is why I am offering you to acquaint yourself with the main ways of putting on weight. But of course which way to chose is only up to you.
First of all you should decide what kind of weight you want to increase.
It might be mostly fat mass or still muscle one. But I think that there is hardly a person who would like to increase weight with the help of fat, but of course things happen.
So let us acquaint ourselves with all of the ways How to increase weight fast one by one…
how to increase weight fast
1. The first way of increasing weight —
is eating high-calorific food and “bad” carbohydrates with high glycemic index.
It could be all carbohydrates that cause a jump of glucose level in your blood which leads to hyperglycemia. These carbohydrates usually have glycemic index which is above 50.
First of all it is white sugar whether it is pure or combined with other food. For example, sweets, candies. Here we also can apply all industrially processed food, especially bread made with white flour, white rice; drinks, especially alcohol drinks; potato and maize.
When using these foods you will put on weight, but you will have to pay for it with your health, because overweight affects your body in a negative way.
2. The second way of increasing weight fast –
is not that easy and fast as the first way, but it is more healthy – it is gaining muscle mass with the help of weight training or with the help of bodybuilding.
But is this case you will not just put on some weight, you will also make your body nice and strong, and it will not be a shame to show such a body to others.
But, to use this way you have to be very patient, because there is no way to gain muscles without special training programs, proper diet and rest.
That is why forget that utopian thought that you will go to gym, take small dumbbells or sit on a stimulator and everything will go off without a hitch. That will never happen that way.
Hire yourself a personal trainer and read more books about bodybuilding and only after that you will understand whether you really need it all and whether you would be able to bear such a rhythm. Or maybe it would be better to use the first way – to lie on the sofa and eat candies and cakes.
3. but there is another one way to increase weight fast –
It is very fast, but it can destroy your organism – it is bodybuilding using anabolic steroids.
In this way of increasing weight you will definitely grow, but just like Vladimir Turchinski once said, ‘The amount of harm that anabolic steroids will cause to your organism cannot be compared with the results that they will give you’.
Anyway, it is up to you which way to chose. Each way has its own advantages and disadvantages. Everything depends on what you really need. Maybe you need to work out your muscles, then you should chose the way number 3, but if you want to be healthy and be in a good shape, then you should chose the way number 2.
And which way of increasing weight of your body suits you?

Friday, March 4, 2016

Friday Practical Pointers: Changing Your Relationship with Pain

by Baxter and Nina
Jim Coughlin, Age 60
Those of you with health conditions or injuries that have resulted in ongoing, chronic pain or intermittent pain, (think low back injuries, fibromyalgia, and chronic migraine headaches, to name just a few) may have developed a certain adverse relationship with pain over time in the form of feelings of anger, fear, worry, anxiety, despair, sadness, or loss. Unfortunately these responses to pain will often trigger your stress response, which typically increases your pain. And brooding about the pain in general can increase your perception of your pain levels, something we call “the pain on top of the pain.” 

In addition to allowing you to actually reduce your pain levels (as your pain reduces, your attitudes and feelings toward it may also shift), yoga enables you to actively change your adverse relationship to pain in the following ways: 
  1. Because brooding or thinking excessively about your pain can distort your accurate perception of your true pain levels, using yoga stress management techniques to quiet your mind allows you to short-circuit your mind’s tendency to focus on pain. In your new, clear state of observation, you may discover that your true pain levels are lower, sometimes significantly, than the pain you experience while focusing on it. 
  2. You can improve your pain tolerance by listening to your body and improving your overall self care. You can also improve pain tolerance by cultivating mental and emotional equanimity, which enables you to be more content with what you have and what you don’t have. 
The following sections provide details about how to use this techniques.

How to Quiet Your Mind While in Pain 

To short-circuit your tendency to brood about pain, use any stress management techniques that work for you. We particularly recommend:
  • Breath Awareness. Repeatedly coming back to your sensations of breathing interrupts your thoughts about pain 
  • Structured Breath Practices. Simple breath practices that require concentration, such as timed 1:1 or 1:2 inhale/exhale patterns and alternate nostril breathing, keep your mind focused on your breathing. 
  • Guided Relaxation. Recorded or self-guided relaxation practices keep your mind engaged on physical relaxation or positive imagery. 
As you practice these techniques, your pain levels may decrease, your tolerance for pain may improve, and your typical mental-emotional responses to your pain may become less intense or may even dissipate. 

In addition to quieting your mind, meditating on positive emotions, such as gratitude or joy, or on positive images, enables you to transform feelings of sadness, frustration, fear and anger into more positive states of mind. One study showed that meditating on joy literally activated the areas of the brain that produce positive emotions. This surge of positive emotions may reduce your pain levels, while also improving your pain tolerance and your attitude about the pain.

Meditation also has the long-term benefit of teaching you about mental habits that might be contributing to your pain, allowing you to consciously choose new, healthier ones. For example, your chronic pain may have triggered stress eating, which led weight gain that is worsening your pain (which can happen, for example, with knee arthritis). By observing your thoughts during a meditation practice, you may become aware of the chain of events that leads to your stress eating and then choose a healthier response to the pain, such as taking a short movement break that actually lowers your pain, rather than turning to food. 

How to Improve Your Pain Tolerance 

Mindfulness practices where you focus on your physical sensations other than pain, such as meditation, breath awareness, and mindful practice of asanas, allow you to tune into your body and recognize its needs. These practices teach you to differentiate between chronic, low- level pain and acute surge in pain, which will allow you to have a better sense of when to exercise and when to rest, of how far you can safely move in various yoga poses, and of which practices actually help your pain. (Of course, If your pain becomes severely acute and disabling, it would be wise to get to your doctor urgently.) 

Tuning into your physical sensations will also allow you to improve your self-care in general, as you, for example, realize you need more sleep or to schedule a health care treatment. Becoming an active participant in your self care can give you a sense of control, which can help you move past your adverse relationship towards chronic pain And improving self-care may even allow you to start participating more in the activities that matter to you, improving your overall quality of life.

Another way to improve your pain tolerance is to cultivate equanimity, the original aim of yoga:

When a man has mastered himself,
he is perfectly at ease in cold,
in heat, in pleasure or pain,
in honor or in disgrace. —Bhagavad Gita 

Studying yoga philosophy provides you with an alternative way of thinking about your life, enabling you to be more content with what you have and what you don’t have. And that includes accepting chronic pain as part of your life, which allows you to tolerate the pain more easily. In general, cultivating contentment as described in sutra 1.33 Patanjali’s Yoga Sutras, can be very helpful. 

1.33 Through cultivation of friendliness, compassion, joy, and indifference to pleasure and pain, virtue and vice respectively, the consciousness becomes favorably disposed, serene and benevolent.

Another particularly helpful technique for countering the negative reactions of your mind is pratipaksha bhavana, which means “cultivating the opposite.” 

3.3 When disturbed by negative thoughts, opposite [positive] ones should be thought of. —Swami Satchidananda 

Here’s an example of how to apply pratipaksha bhavana: If you had an increase in pain, your first thought might be, “I won’t be able to go to work today with this level of pain.” But practicing pratipaksha bhavana could allow you to reframe this thought to, “I will be able to work today, despite this pain level” or “Let’s see if I can work today, despite this pain level.” See Cultivating the Opposite for more information on pratipaksha bhavana.

But any yoga philosophy that speaks to you and helps you cultivate balance and equanimity in your mental and emotional life is going to help you increase your pain tolerance and improve the quality of your life.

Subscribe to Yoga for Healthy Aging by Email ° Follow Yoga for Healthy Aging on Facebook ° Join this site with Google Friend Connect

Thursday, March 3, 2016

Happy News!

by Nina
In January we announced our fundraiser for YFHA contributor Jill Satterfield, who needed heart surgery to repair her mitral valve (see Fundraiser for Jill Satterfield). Today I thought I’d update you with the good news that Jill’s surgery was successful, and she will be going home today! She still needs quite a bit of time to fully recover from this serious operation, but we’re so happy to see her back on the road to health at long last.

So I just wanted to take a moment today to express my happiness at the good news of the day, and thank all of you who contributed to our fund at GiveForward. I’m so grateful to everyone who has made it possible for Jill to get the medical treatment she needed and to stay in her home during her recovery period.

Subscribe to Yoga for Healthy Aging by Email ° Follow Yoga for Healthy Aging on Facebook ° Join this site with Google Friend Connect

Wednesday, March 2, 2016

Observing Unhealthy Breathing Patterns

by Nina
Trees are the Lungs of the Earth by Melina Meza
Your ability to breathe in a healthy way can be compromised unhealthy breathing patterns, such holding excessive tension in your abdominal muscles. However, by practicing breath awareness with special attention to the movements of your chest and belly, you can learn about your particular breathing patterns and potentially identify any problems. 

In normal, healthy breathing, as you inhale, your chest and ribs will expand slightly and your belly will rise up or bulge forward, and as you exhale, your belly will relax back and your chest and ribs will relax back toward center. 

Although not common, there are two different breathing patterns that occur in some people that can be problematic:

Chest Breathing. Instead of your belly expanding on your inhalation and relaxing back on your exhalation, there is no movement in your belly at all. All the movement during respiration is in your chest alone. 

Reverse Breathing. Instead of your belly expanding on your inhalation, it actually sucks in during the inhalation and your chest expands dramatically. And on your exhalation, your belly rises as your chest relaxes. 

To observe your own breathing patterns: 
  1. Start by setting yourself up in a comfortable reclined pose, such as Savasana or Reclined Cobbler’s pose, or a comfortable supported seated pose, such as Easy Sitting pose with your back against the wall. 
  2. Take a moment to relax completely and breathe naturally, with an easy, relaxed breath. 
  3. Keeping your breath easy and relaxed, turn your awareness to your chest and belly as you inhale and exhale. Just watch. Is your belly rising/expanding/bulging with your inhalation and relaxing back with your exhalation? Or is something else going on? 
If you do identify a problematic breathing pattern—or think that you have—unless you are a very experienced practitioner of pranayama, it’s best for you to work with your yoga teacher or yoga therapist to change your breathing habits. Your present pattern of breathing is likely to be a well-established one. And an expert will not only be able to observe your breathing with a trained eye but will also have techniques available to effectively coach you to change your ingrained habits. 

Subscribe to Yoga for Healthy Aging by Email ° Follow Yoga for Healthy Aging on Facebook ° Join this site with Google Friend Connect

Tuesday, March 1, 2016

Techniques for Supporting Your Respiratory System

by Baxter and Nina
Joy Sassoon, Age 60, photographed by Tanya Constantine
Your respiratory system is essential to life, and a completely healthy chest and lungs make a full life more likely. Today, we are recommending techniques for supporting the health of your respiratory system, whether you are healthy and want to stay that way, or whether you have a respiratory disorder or medical condition that directly affects or may eventually affect your respiratory system. These recommendations apply to people who: 
  • Are currently healthy
  • Are sedentary but wanting to improve your respiratory system
  • Are ex-smokers 
  • Have lung diseases, such as asthma, exercise-induced asthma, and chronic obstructive pulmonary disease (emphysema)
  • Have been exposed to lung toxins, such as asbestos
  • Have heart conditions such as congestive heart failure that directly affect the lungs or heart valve problems that may eventually affect the respiratory system
Start by considering your current condition. If you are currently healthy, you can use a combination of any of our recommended active and relaxing practices. 

For those who have a compromised respiratory system, increased activity could cause unwanted stress on your system. So start with more passive, gentle practices, such as restorative poses, beginning level breath practices (for example, 1:2 ratio breathing) and slow, gentle dynamic poses such as Cat/Cow pose. When you observe gradual improvement in your respiratory system, you can advance your practice. 

If you are currently having trouble breathing, such as from a sudden flare of asthma, we recommend that you focus on stress management practices, such as restorative and supported poses, such as Cobbler’s pose (Baddha Konasana) at the wall, version 4 of Supported Backbend, and version 2 of Reclined Cobbler’s pose, and guided relaxation. (Of course, you should also continue using the protocols prescribed by your doctor for an acute situation.) 

If you have a severe lung disease, such chronic obstructive pulmonary disease (emphysema), unless your doctor says it is safe to advance your practice, you should focus on supported poses and gentle breath work. When you are ready to advance your practice, try a gentle, active practice, as this may provide you with important benefits, including less shortness of breath, better exercise tolerance, and improved sleep. 

Cautions: In general, if you become suddenly short of breath, stop whatever yoga practice you are doing, sit down with some support, in a chair or against a wall, and see if reducing activity quickly resolves your symptoms. If not, seek prompt medical attention. Shortness of breath can be the sign of more serious underlying problems, such as a dropped lung (pneumothorax) or a heart attack. On a less urgent level, be mindful that Savasana or other reclined poses (supine or prone) could make breathing more difficult for a person with lung disease. Adapt supine poses by raising the torso with a support, such as using a bolster under your back in Reclined Cobbler’s pose (Supta Baddha Konasana). Adapt prone poses by finding more space for the belly to move, for example, by widening your knees in Child’s pose. If these adaptations do not improve your breathing, skip these poses for now and practice meditation or breath practices in a seated position. 

How Often to Practice. If you are healthy, practice up to six days a week, alternating days of active practice with days of gentle and restorative practice. If you are currently experiencing respiratory problems, try practicing four days a week, also alternating between active days with restorative days. If you see positive changes, slowly add more days of practice. 

Breath Awareness. Practicing simple breath awareness can reveal breathing habits that you are not currently aware of. You can practice breath awareness in both active poses and relaxation poses to reveal breathing patterns you might want to change, such as chronic shallow, rapid breathing that might not be so healthy during Sun Salutations or physically demanding postures. You may decide to skip this technique However, if you are experiencing shortness of breath, such as an acute asthma episode, you may wish to skip this technique, as focusing on your breath may make you more anxious. 

Balanced Practice. Because one of the primary benefits of yoga asana for your respiratory system function is releasing any tension in the muscles and fascia around the chest region, we recommend practicing a balances sequence that includes: forward bends to open your back, backbends to open your chest, side bends to open the sides of your torso, and twists to release tension from the diagonal muscles and fascia around your chest. Include a mix of both dynamic and static poses. If you have been sedentary for a period, an asana practice that includes these elements can help you regain strength in all the muscles that assist in breathing and improve your overall lung capacity. Round out your practice by including breath practices, restorative poses, and stress management practices.

Breath Practices. Since there are times in your everyday life when you need to breath fast and deep and other times when you should be resting and breathing comfortably, your breath practices can help support whatever context you find yourself. So you should do both stimulating as well as relaxing breath practices. For relaxing your respiratory system a good way to start is by using a 1:2 ratio breath or by slowing and slightly deepening both your inhalation and exhalation equally. To improve your total lung capacity, start with an even breath of 2 seconds in/out,. Then, gradually over time work up to 6 seconds or more in/out, up to your tolerance. 

Dynamic Poses. Focus on dynamic poses that stretch and strengthen the muscles and tissues around your chest area. For example, moving with your breath between Mountain pose, Arms Overhead pose, and Standing Forward Bend and back stretches and strengthens both the front and back of your chest. Moving between Arms Overhead pose to Crescent Moon pose (the side bending version of Arms Overhead pose) stretches and strengthens the sides of your chest. And a dynamic seated twist stretches and strengthens the diagonal muscles of your torso. 

Start with 6 rounds in and out, and work up to 10 rounds. Initially move at a comfortable breath pace. Experiment with slowing down your breath and movement pace or speeding both up gradually to train the body for different situations. 

Static Poses. Focus on poses either stretch or strengthen your torso, including forward bends, backbends, and twists, or standing poses that include or combine those movements. Some examples are Standing Forward Bend (Uttanasana), Triangle pose, Extended Side Angle pose, Warrior 1, Cobra pose variations, Marichyasana 3 or Easy Sitting Twist. While passive stretches such as a Supported Backbend will only improve flexibility, many active poses can improve both flexibility and strength. For example, Triangle pose strengthens some muscles along the slides of the torso while also stretching others. So for improvements in flexibility, combine those active poses with passive, supported stretches, such as a Supported Backbend or Reclined Twist. 

If you are new to practice or have a respiratory condition, start off with short holds 10 seconds. Then gradually work up to 30 seconds. From there, to maximize improvements in strength in flexibility and strength, aim for eventual holds of 90 seconds or more. 

Restorative Poses. In general, restful poses are beneficial to the overall functioning of your respiratory system, as they rest your overall respiratory system and lower stress levels. We recommend practicing restorative poses that gently stretch and open your torso area but do not trigger shortness of breath, such as Supported Backbend, Childs’s pose with or without a bolster, and Legs up the Wall pose with arms to your sides or overhead. If focusing on your breath in these poses causes anxiety, try any focusing instead on a different physical sensation, an image, or a mantra. 

Stress Management. Reducing stress has positive effect on your immune system, which could lower your chances of getting infections of the respiratory tract, from the nose and mouth all the way into the deep lungs. In addition, your lungs need downtime to rest and repair, so spending time in Rest and Digest mode provides a beneficial break for them. And for those with chronic respiratory system conditions, practicing regular stress management can improve the quality of your life by reducing anxiety and fear. Use any of the stress management practices we have described elsewhere (see The Relaxation Response and Yoga) that you can tolerate and that also lead to improvements in your breathing.

Subscribe to Yoga for Healthy Aging by Email ° Follow Yoga for Healthy Aging on Facebook ° Join this site with Google Friend Connect

4 Healthy Nutrition Tips for Skinny Guys to Build Muscle

Here are 4 healthy nutrition tips to help skinny guys increase muscle growth. There are many myths out there that suggest gaining mass has to do with 50% exercise and 50% nutrition. Then there is another fact that states it should be 70% nutrition and 30% exercises. Which is the correct one? Well, in my opinion, IT’S NEITHER. One should always focus 100% on nutrition… and 100% on workouts as well! The problem with having divided attention is that most people will end up NOT putting in enough effort. That’s why foods that go into your body are as important as the exercises you bust out in the gym.

Protein

The body needs protein to build muscle. Simple as that. No protein = No muscle growth. In order to build muscle, a skinny guy or anyone else would need about 1.5 grams per pound of their body weight. So for 125 pounds of body weight, one would need to consume 125 – 188 grams of protein per day. This may sound like a lot of protein if you’re a skinny guy whose eating barely 3 meals per day. If this was the case, the entire 3 meals for that day would be made out of PROTEIN. But when including the other types of nutrition below, it stabilizes the diet.
Nutrition  to Build Muscle


Carbohydrates

Just like how protein builds muscle, carbohydrate is the ultimate source of fuel that gets the body running. Of course, they are several types of carbohydrates. Some are good when it comes to muscle building, some are not so good. Some are good to be taken in the morning, but not so good in the evening. But putting aside complexity, the ideal skinny guy would want to get in about 2.5 grams of carbohydrate per pound of body weight. That would be about 250 – 315 grams of carbs for a 125 pound person.

Fats

Here’s a nutrition that skinny guys THINK they should not stay away from. Most of them would think that in order to gain more size, they would need to eat more fatty foods. Well, it’s not entirely wrong if you know that there is good fat and bad fat. The one that we need are called Essential Fatty Acids (EFA’s). Remember, there is a big difference between growing big and muscular, and growing big with flabby love handles. EFA’s can be found in tuna, walnuts, salmon, and sunflower oil. 80 grams of fat per day for a 125 pound person should be more than enough.

Water

I call this the elixir of life. It is a fact that human beings can carry on living without eating, but not drinking. You would want start off slow (if you haven’t been drinking a lot lately) by trying to get in at least 8 glasses a day, which is about ½ a gallon. Then gradually increase your intake to a gallon a day. It sounds a lot. But with the heavy workout routines and high calorie meals in place, you’re going to want to clear out the toxins and metabolize the excess calories in your body.
By incorporating these 4 healthy nutrition tips into a daily meal plan, any skinny guy would be able to maximize their results manifold when it comes to BUILDING MUSCLE.

The Top Exercises For The back muscles

Whatever you think about the chest and biceps, it’s the back muscles that really show how strong you are. They give the classic v-shape that is admired by women on beaches everywhere.

The back muscles consist of:
Latissimus Dorsi: This is the triangular shaped muscle that goes from your waist to under your shoulders. Highly developed “lats” seem to flare out when seen from the front or from the back.
Spinal Erectors:These are the muscles of the lower back.
Trapezium: This is the triangular shaped muscle that extends from the neck to between the shoulder blades.
Developing the back consists of a variety of movements due to the various muscles of the back and it also consists of heavy weightlifting due to the largeness of the back. Training the back also requires different hand positions on the bar to bring out different areas.

Here are the top exercises for the back muscles

Bent Over Barbell Row

Stand with your feet apart, grasp the bar with a medium overhand grip. Bend your knees slightly and look forward while keeping your back straight.
With your head up, bring the bar towards your chest, hold and lower slowly to the start position, immediately start your next rep then.
Variations include seated cable rows or machine rows.

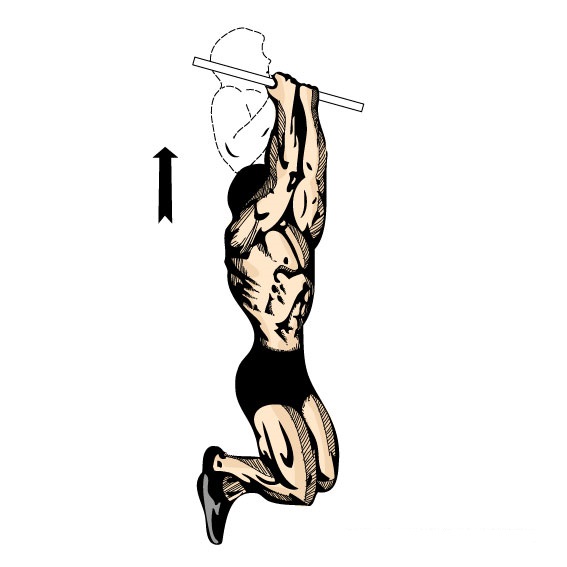
Pull-ups
pull ups

Grasp an over head bar with the palm of your hands facing away from you. While concentrating on the lat muscles pull yourself up until your neck is level with the bar.  Slowly lower to the start again.
Variations of pull-ups include wide grip pull-ups and pull-ups that you perform so the bar comes up behind your head.

Chins
Chins UPS

Grasp the bar with your palms facing you, pull your self up until your chin touches the bar, slowly lower yourself again to the start.
Variations include  holding a special bar that allows for your palms to be facing each other when you pull yourself up.

Lat Machine Pulldowns

These can be performed with a variety of grips which include palms facing you and palms facing away and also special attachments that place your hands in different positions.
Hold the bar, position yourself with you knees under the support bar, adjust it according to your needs and pull the bar down towards you, squeeze your back and slowly higher the bar up again.

Deadlifts
Deadlifts

Deadlifts strengthen and build the lower back.
CAUTION: Deadlifts can be dangerous if not performed correctly especially while using heavy weights.
Build the weight up slowly while using correct form until you can handle heavy weights.
Place a barbell in front of you on the floor. Stand with your feet comfortably apart and grasp the bar with an overhand grip. Keep your back straight, look forward, bend your legs down and using your legs initially straighten up until you are standing straight.
To lower, bend the knees, look straight ahead and lower the bar keeping your back straight.

One Arm Dumbbell Row

Hold a dumbbell in one hand, with the other hand hold onto an object, be it a bench, a chair or even your own knee.
With your back nearly parallel to the floor, extend the arm straight and then bring the weight up to your side and squeeze the back muscles. Continuing to keep your back straight and parallel to the floor lower the weight until your arm is extended once again
Repeat for the other arm.
Variations include one arm cable rows and one arm smith machine rows.

Shrugs
Shrugs

Shrugs work the trapezium muscle.
Stand up straight, keep a slight bend in your knees and hold a dumbbell in each hand. Without bending your arm use your upper back muscles to “shrug” as high as you can, then lower to the start again.
You should look like you are trying to get your shoulders to touch your ears while performing this move.