How Much Protein You Need and

Pro Bodybuilders eat about one gram (sometimes even 1.5 grams) of protein per pound of body weight or per pound of non-fat tissue. I'm sure you've seen that the recommended dail

Comments

Saturday, March 28, 2015

Balance Pose of the Week: One-Legged Juggler

Subscribe to Yoga for Healthy Aging by Email ° Follow Yoga for Healthy Aging on Facebook ° Join this site with Google Friend Connect

Two Simple Home Exercises for Women to Lose Weight

This is good news for all those women. Now, they can simply follow the exercises mentioned on this page and speed up their weight loss with a lot less effort and time. If you’re one of those who keep working out but are not  getting the results you are wishing for, then this page is a must read for you. One should go for exercises that make use of full body movements and use more energy and incorporate more muscle groups. Let us take a look at two effective exercises that intensify and speed up the metabolism and use your bodyweight.
fitness girl


Read on to know the real exercises that can help you get real faster weight loss results.

Stair walks

We all have stairs in our home, either leading to the basement or the first floor. Make good use of them for exercising and just by devoting 10 minutes walking up and down the stairs can do the magic. That’s it, nothing more and nothing less. Soon, you will get used to all that walking and claiming the stairs. You will simply be amazed at the results you see as you walk both up and down the stairs. The results will be fast and incredibly quick. So, you can remain slim and fit as long as you have some stairs in your home.
Stair walks

Jumping jacks

Everyone knows about Jumping jacks and these are proven weight loss tactics. Let us see how you can make the best use of jumping jacks. Start with jumping jacks for 1 minute at a time and you can do these mini-workouts a couple of times and these will work on getting your metabolism up too. Research shows that multiple short workouts are a lot better than one longer workout to get better weight loss results.

All those women, who are actually listening, if you’re truly serious about losing weight, and want to do something at home then do some Jumping jacks and follow those stairs. Aloes, keep a watch over what you eat and follow a nutritious diet. The best part is that you need not take out some special time or get some expensive equipment to do your exercises. Now, there is no need to go to those crowded gyms or get some expensive equipment at home.

It actually doesn’t matter where you are working out, as long as you are doing the right exercises and targeting the fat and burning the calories with the right and effective exercises.

Exercises for Best Biceps Workout for Mass


The biceps are arguably the most widely trained muscle because of they ‘show off’ appeal to many bodybuilders. To ensure that your biceps are well trained and developed, you will need to understand the biceps a bit more. With this understanding, you can than choose your exercises to create your best biceps workout for maximal effect. There are many bicep exercises that you can include in your best biceps workout.  In this article, we will look at three biceps exercises that you must include in your workout, and the reason behind why they can be so effective to develop your biceps.
Bicep Workouts


1. Barbell Curls

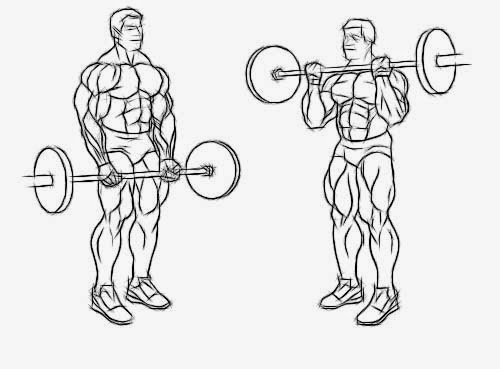
The barbell curl is the old work horse of biceps training that you must include in your best biceps workout. Our bicep muscles are made up of muscle fibers that can be easily activated and recruited for training. They are also generally thick fibers that will grow in good size with substantial stimulation. Hence, the key to developing the biceps is to target the biceps from all angles so that maximal recruitment of fibers occurs for growth. The barbell curl is a basic mass builder of the upper arm that allows for heavy poundage. Grip a barbell using an underhand grip with arms shoulder width apart. Begin the exercise by lifting the barbell towards your chest, keeping the upper arm from elbow onwards fixed at all times. This will isolate the biceps to do the work of lifting alone. When the barbell touches your chest, slowly and deliberately return the barbell to its starting position. Emphasize on resisting the downward motion. This will work the bicep more. For the purpose of building mass, choose a weight that you will fail at 8 repetitions and perform 5 sets of 8 repetitions.
 Barbell Curls

2. Hammer Curls

The Hammer Curl is one exercise in the best bicep workout that will target the contraction of the muscle from a different angle. Grasp a dumbbell each in both hands and keep them by your side as if you are holding the dumbbells as hammer head. You can alternate lifting the dumbbells from each hand or lift both dumbbells together. Lift the dumbbells in a curl like motion. As you lift the dumbbell towards your chest, rotate the dumbbell such that you will end in a position whereby you palm is actually facing you at the peak of the lift. You should rotate the dumbbells maximally. In addition to the usual contraction of a bicep curl, the rotation of the dumbbell in this manner will activate more muscle fibers for contraction. These additional fibers that normally will not be worked will be contracting as well. If you actually analyze your biceps closely during this exercise, you will notice that at the peak of the rotation, the muscles actually contract a little bit more with the rotation. Hammer curls are excellent fiber recruitment exercise for your best biceps workouts.
Hammer Curls

3.  Triple Threat

This is an exercise that makes use of the fact that all muscle fiber do not fatigue at the same time. You must include the Triple Threat in your best bicep workout. You can do this exercise using barbells or dumbbells. Choose three sets of equipment of varying weight. The heaviest set should be a weight whereby you will fail at 8 repetitions only. Start your curls for both arms with the heaviest set, performing your 8 repetitions. As soon as you finish this, quickly drop this set, and pick up the next heaviest set and repeat for another 8 repetitions without resting. Once that is done, complete the last 8 repetitions using the lightest set. Allow no rest again. By the time you complete these 24 repetitions, your biceps will feel as if they will explore anytime. Perform 3-5 sets of the Triple Threat. It is wonderful exercise that can fully stimulate the biceps. When lifting the heaviest set, all the most power fibers will be activated. When these are fatigued, the second heaviest weights will recruit those fibers that are still active. The process continues until all the fibers are activated.

Your best biceps workouts can include any exercise that you would like. The three exercises recommended here will target your biceps from different angles. The barbell curls are good for general mass building. The rotations done in Hammer Curls, recruit seldom use fibers
 of the biceps. The Triple Threat works all fibers till exhaustion. With these three exercises,
 you can be sure that your best bicep workout will be successful.

Build, Strengthen, & Outline Your Back With The Back Attack Workout

Hi everyone and welcome to the back attack workout! This workout is comprised of 4 exercises done in a super set format. The workout is extremely difficult and is geared toward helping you build, strengthen and define all your back muscles.

There are two elements to the present workout and each part is completed in an exceedingly super set format. This mean that in half 1, there are 2 exercises that you’ll perform one after the other. You’ll then take a one minute break and repeat the 2 exercises. In order to finish part 1, you must end four super sets of the 2 exercises specified in part 1. Half 2 of this back attack workout is the identical format as half 1 except that there are two completely different exercises.
Back Exercises

Below are the exercises for this workout.

Half one – Perform four Sets of the 2 Exercise Combo Taking Only 1 Minute Rest Between Sets
Exercise 1 Twisting Pull Up
As Several Reps As You Can to Failure
Exercise 2 Physioball Pull Over Crunch
twelve Reps

Half two – Perform four Sets of the 2 Exercise Combo Taking Solely 1 Minute Rest Between Sets
Exercise 1 Thumbs Up Pushups
As Many Reps As You Will to Failure
Exercise 2 Dumbbell or Kettle Bell Aspect Lunge Row
12 Reps to Every Facet of Your Body

Twisting pull ups and thumbs up push up are undoubtedly the foremost difficult exercises during this determine (especially the thumbs up pushups!). Focus yourself on every rep to get maximum contraction of your muscles and to try and perform negatives on the means down.

This is an glorious back workout that may be done quickly and efficiently in the gym or at home and I encourage you to try it and implement it into your workout over the approaching 3 to 4 weeks. Once this era is over you are visiting wish to modify up your back routine and concentrate on another exercises. Its necessary to change up your workout routines frequently however do not suppose that you’ll never do that workout again. Quite the opposite, you are visiting wish to keep and use it a few weeks down the track as it will once once more add a brand new variety to your workout.

Don’t limit yourself to adding variety strictly to your back workout. For maximum body development, you’re visiting need to continually add selection to any or all your workouts. Because of this, I counsel you make a arrange of what you would like to achieve over a few weeks or few months and mark down your fitness goals. From there you’ll then notice yourself a workout and nutritional program geared towards your goals.

Every few weeks, your workouts ought to vary in rep tempo and rep counts also they ought to move in and out of non circuit coaching into circuit training mode. This can then maximize your lean muscle gains and strength gains and insure you are burning as much fat as possible in order
 for you to develop a lean, muscular and ripped physique.

Friday, March 27, 2015

Friday Q&A: Stretching a Tight Ankle

Q: I would love to get some information about how to get at this part of the ankle. I do a daily yoga practice but still have considerable tightness around the Achilles heel and the outside of it. I'm not sure but it could be from cycling. Standing poses aren't eliminating the problem.

A: Because your foot position in cycling is plantar flexion (keeping your foot pointing downward), it could be that your tightness in the area around the Achilles heel is indeed from cycling. But I think the first approach is not just to focus on the tightness of the specific region but instead to approach your body more globally.

While standing poses are typically taught to beginners as an approach to creating a foundation on which to build your yoga practice, learning how to execute the basic poses is just the beginning of cultivating body sensitivity and alertness. When addressing foot and ankle issues, it is important to differentiate where your weight is distributed in the standing poses and also to vary how you do the poses so as to not habituate your central nervous system to always doing the pose the same way.

Learning how to shift weight differently when your foot is not flat on the floor might also help encourage more ankle bending (dorsiflexion). So try using a slant board that you place under your foot in various positions as a way wake up parts of your foot and ankle that are “asleep.” Doing standing poses on the beach in the sand or on uneven outdoor surfaces might be a way to challenge ankle sensitivity, strength, and flexibility. Likewise, doing standing poses on softer surfaces, such as multiple sticky mats or on a couch cushion on the floor, challenges your foot and ankle muscles and would be helpful.

Next, you can stretch the two main parts of your calf muscles (the gastrocsoleus complex), as this might be very helpful to increase your ankle bending (dorsiflexion). 
To stretch your gastrocnemius muscles:
  1. Start by facing a wall.
  2. Step your right foot forward so it is a few inches from the wall (but not touching it).
  3. Reach your arms forward and place your fingertips on the wall, about shoulder height.
  4. Step your left foot back so your feet are in Warrior 1 stance, with your front heel in line with your back heel and your back leg turned slightly out (approximately 5 degrees). Keep both knees straight and both heels on the ground. 
  5. Now, slowly bend your front knee just till you feel the stretch on your back calf and heel. Keep the heel grounded and try to bend the front knee a bit more, all the time keeping the back heel down. Do not bounce
  6. See if you can hold the stretch up to 90 seconds. But be very conscious of not going too far too fast because you do not want to tear or rupture your Achilles tendon.
  7. Repeat on the other side.
To stretch your soleus muscle, you can use the same pose as for gastrocnemius with one exception:
  1. Start by facing a wall, and follow steps 2-4 from the previous pose.
  2. Now keep your front leg straight as you gently try to bend your back knee until you feel the calf stretch in a different area. 
  3. Again, see if you can hold the stretch up to 90 seconds. But be very conscious of not going too far too fast because you do not want to tear or rupture your Achilles tendon.
  4. Repeat on the other side.
For stretching your heel cords, you could try a single leg heel drop off a block. Start by taking Mountain pose facing a wall with a block on its lowest height on the floor in front of you. Then, with your fingertips on the wall, step one foot onto the block. Now, move your heel back so it drops over the edge of the block, creating a gentle stretch. If you have stairs in your home you can do this by dropping one heel over the stair lip. You can vary this exercise by keeping your hip and knee straight as you drop your heel or by keeping your hip straight and bending your knee slightly.

Do not get discouraged with your standing poses, but I might recommend more comprehensive stretching of your:
  • Hamstring muscles (backs of your thighs)
  • Iliotibial (IT) band (sides of your thighs)
  • Gluteal muscles (buttocks) and hip rotators (sides of the hips)
  • Hip flexors (fronts of the hips) and quadriceps (fronts of the thighs)
I also might recommend getting a consultation with a health professional about your particular ankle mobility or stiffness. Sometimes some good old joint manipulation of a specific part of ankle joints does a world of good in helping you gain mobility. Then the yoga will help you maintain the strength and stability.

—Shari

Subscribe to Yoga for Healthy Aging by Email ° Follow Yoga for Healthy Aging on Facebook ° Join this site with Google Friend Connect

Overhead Triceps Extensions: My personal Tips. By Veeraj Goyaram

Overhead Triceps Extensions: 
My personal Tips
By Veeraj Goyaram
Cape Town, South Africa 

The overhead triceps extension ranks among my best triceps exercises of all time. My other favourite ones being cable pushdowns and bent-over cable extensions. Most of the time I like to begin my triceps workout with cable pushdowns which is more of a "contracted" exercise because I contract my triceps hard at the bottom for a second after which I move to overhead extensions which works great to stretch the triceps. It leaves me with a great feeling. Pump it and then stretch it! This approach has always given me good results. By the way, this exercise is also called "French Presses" although I don't think the French had anything to do with its invention (correct me if I am wrong).


Overhead extensions are often said to "isolate" the long head of the triceps. The term isolation is a misnomer because we all know that we cannot isolate any particular triceps head as all three heads work together during any triceps exercise. However, from personal experience I do feel this exercise more in my long triceps head. It can be said that this exercise "emphasizes" the long head. You may or may not agree with me. Overhead extensions helped me build that "semi-lunar" shape in the triceps apparent when I flex the biceps (pictured). I didn't have this until I start doing overhead triceps extensions.

Personal tips

Tip #1: Standing or seated
This exercise can be performed standing or seated. Seated can offset any use of "body English" (cheating) when the going gets tough. I prefer to do the seated version on a bench with back support although I sometimes do the standing version. 

Tip #2: EZ-Bar, Dumbbell or Triceps Bar?
The EZ bar (using the inside grip) is highly recommended because it is less stressful on the wrists for most people. Some of you may be wondering, "what stress on the wrists?". If you don't feel any wrist discomfort using a straight bar then go for it. A short bar is preferable to a longer bar as less effort is spent in balancing the bar, of course. I have found that the EZ-bar bothers my elbow a little bit especially when I am going a bit heavy. Therefore, whenever I need to hammer the heavier weights I use dumbbells which are way easier on the elbows. Elbow pain aside, I do like the feel of the EZ-bar a lot and would reserve the use of the bar whenever I am using higher rep and lighter weight training to build a great muscle-building pump.  Yet another nice piece of equipment is the triceps (or hammer) bar. 

The Hammer Bar works amazing. A little flaring
of the elbows is necessary. 
Tip #3: Flaring elbows
You should be getting the smell of bullcrap when anyone approaches you in the gym while doing this exercise and tells you to keep your elbows close otherwise the exercise is useless. A little flaring of the elbows is necessary because this reduces discomfort in the shoulders especially those who have reduced shoulder flexibility. Do not flare excessively.

Dumbbells are less stressful to my elbows
Some Sample routines incorporating Overhead Triceps Extensions


BEGINNER WORKOUT DESCRIPTION: This workout can be performed on a dedicated arm day or after a pressing workout (E.g. Chest or Shoulders). Perform two light warm-up sets on the first exercise and then go straight into the workout. Do not use heavy weights. Learn to feel the exercises working the triceps. Use a weight which is heavy enough to achieve 10 reps. If your focus is on moving weight rather than feeling the muscles work then quit bodybuilding and join powerlifting.


Anything you want to add? Anything you want to share about this exercise? Any further tips? The floor is open! Drop me a line. 

OTHER MUST-READ TRICEPS ARTICLES ON BODYBUILDING MAURITIUS IF YOU WANT 
BIG TRICEPS
THE JM PRESS

TRICEPS KICKBACK TECHNIQUE


GETTING THOSE GUNNS TO GROW


TRICEPS PRESSDOWNS


------------------------------------------
Join us for discussions on our facebook group
Free advice & daily bodybuilding talk
Your #1 Bodybuilding destination in Mauritius 
_________________________________________________________________________
©2015. Veeraj Goyaram, Bodybuilding Mauritius. Any reprinting in any type of media is prohibited.
Disclaimer: The Content on this site is intended to be used for educational and entertainment purposes only. It is not intended to be and should not be interpreted as medical advice or a diagnosis of any health or fitness problem, condition or disease; or a recommendation for a specific test, doctor, care provider, procedure, treatment plan, product, or course of action. BODYBUILDING MAURITIUS is not a medical or healthcare provider and your use of this site does not create a doctor / patient relationship. We disclaim all responsibility for the professional qualifications and licensing of, and services provided by, any physician or other health providers posting on or otherwise referred to on this Site and/or any Third Party Site. Never disregard the medical advice of your physician or health professional, or delay in seeking such advice, because of something you read on this Site. We offer this Site AS IS and without any warranties.  Correspondence: vicgoyaram@gmail.com
_______________________________________________________________________________

Thursday, March 26, 2015

Side Plank Pose for Scoliosis Challenge: Conclusions

by Nina
 In the fall, I read some compelling about Dr. Loren Fishman’s study on using Side Plank Pose (Vasithasana) to improve scoliosis (see Side Plank Pose (Vastithasana) Could Reduce Spinal Curves in People with Scoliosis!) . Because I myself have mild scoliosis, I decided to experiment by doing the practice myself and I issued the Side Plank Pose for Scoliosis Challenge on November 17, 2014. I said that I was going to be doing the pose as Baxter recommended: twice on my convex side (the left side for me) and once on my concave side (the right side for me). I asked you to join me and report back on the results of your experiments.


On December 11, I wrote an update on my experiment so far Honestly? Progress Report on the Side Plank Pose Challenge. At that time I said that because the pose was causing me wrist and hand pain and that I had come to dread practicing the pose every day that decided I would no longer practice it six or seven days a week. I said that because I knew that practicing a strength building pose three or four times a week is often enough to build strength, I decided to go for a more modest strategy of practicing only every other day, which felt much safer to me. And when I told Baxter about the modifications I was making, he wrote me:

“I agree that doing the same pose every day is going to produce some problems for students in the wrist, elbow or shoulder on the weight bearing side, although Loren denies that was a problem in their study.”
Are you wondering what ever happened to me since then? Unfortunately, things got worse for me. Before I go into it, I want to say that I learned that the type of scoliosis I have, low lumbar scoliosis, is very rare (only about 5 percent of all types of scoliosis) so I have a feeling that the people in Loren Fishman’s study did not have the same type of scoliosis that I do. And the feedback I’ve gotten so far from our readers showed that none of them developed the problems that I did. But the truth of what happened to me—despite my hopes and best efforts—is that this practice did not work for me.

Basically what happened was my low back pain got worse. And the last time I did Side Plank pose, I felt a terrible twinge just as I was going into it. So I used common sense and stopped practicing the pose entirely. Then I went to see my favorite MD/yoga teacher for an assessment to see if he thought I was having any serious back problems. After running me through the usual medical tests, checking for disc problems, etc., Baxter (yeah, it was him—I’m lucky, right?) concluded I had no serious problems. But he recommended that I should give up the Side Plank pose experiment permanently as it did not seem to be helping me.

Since then I’ve gone back to practicing Side Plank pose the way I used to do it, about once a week, once on each side, for upper body strength building. And it now feels fine. 

Of course, I’m a bit disappointed I didn’t find an easy yoga solution for my scoliosis, but I’m also realistic to know that everyone has a unique body, and that works well for one person might not work for another. 

How about you? Are you still practicing? If so, how are you doing? And, if not, why did you give it up?

By the way, if you'd like to listen to Loren Fishman and Ellen Saltonstall discuss the original study, Yoga U Online now has a free download of there discussion here. And since we now have good photos of all four versions of Side Plank pose, I thought I'd include them all in this post. For information on practicing them, see Featured Pose: Side Plank Pose (Vasithasana).

Subscribe to Yoga for Healthy Aging by Email ° Follow Yoga for Healthy Aging on Facebook ° Join this site with Google Friend Connect