How Much Protein You Need and

Pro Bodybuilders eat about one gram (sometimes even 1.5 grams) of protein per pound of body weight or per pound of non-fat tissue. I'm sure you've seen that the recommended dail

Comments

Monday, February 29, 2016

Video of the Week: Cobra to Child's Pose

Baxter's video for this week is one of his favorite mini vinyasas, moving between Cobra pose and Child's pose with your breath. On your first round of Cobra pose, make sure to check that your shoulders are directly aligned over your wrists, as this is the healthiest position for both your wrist joints and the lower back. If your shoulders are either forward or behind your wrists, adjust your alignment accordingly.

Subscribe to Yoga for Healthy Aging by Email ° Follow Yoga for Healthy Aging on Facebook ° Join this site with Google Friend Connect

Friday, February 26, 2016

Friday Practical Pointers: Your Posture Affects Your Breathing!

by Nina
Supported Backbend is
Excellent for Improving Posture
Did you know that your ability to take a deep, full breath is influenced by your posture? Because when you inhale, your rib cage expands to its maximum to make room for your lungs to expand. And if the muscles that allow your rib cage to expand are tight—due to habitual slouching or other postural problems—your lungs won’t be able to expand to their maximum because there just won’t be as much room within your chest cavity for them. If you have long-time poor posture, you might not notice this problem when you’re sitting at your desk. However, in physically demanding situations, you will likely notice that your breath is restricted. 

And if some of your chest or back muscles are weak, your endurance will be affected. That’s because if the muscles that allow the rib cage to expand are weak and therefore tire easily, you’ll run out of steam when you are in a physically demanding situation that requires rapid or deep breathing. 

To maintain good posture for optimum respiration, cultivating both the flexibility and strength of your torso muscles is vital. In general, a well-rounded asana practice that includes standing poses, backbends, twists, forward bends, and side bends, will help you maintain the flexibility and strength you need. 

However, you can also use asanas to target specific problem areas. For example, if you are developing more rounding of your thoracic spine, adding more back bending poses to your practice will help reverse this trend. If the sides of your chest are tight, you can lengthen them with full side stretches, such as Crescent Moon pose, and partial side stretches, such as Triangle pose. And if your back muscles are tight, forward bends, such as Standing Forward Bend and Child’s Pose, will help release them those muscles.

You can also use asanas to strengthen weak muscles around your lungs. To strengthen chest muscles, practices poses where you lift your chest away from gravity, such as Plank pose and Downward-Facing Dog. To strengthen the sides of torso, practice poses where you keep one side lifted away from gravity, such as Side Plank pose variations and Triangle pose. And to strengthen back muscles, practice active backbends, such as Warrior 1, Cobra pose, or Upward-Facing Dog.

Medical conditions that influence posture, including kyphosis and scoliosis, also restrict your breathing capacity by limiting space in the chest wall . So for these conditions, it is especially important to maintain both the flexibility and strength of your torso by doing poses appropriate for your condition. For scoliosis, there is even early evidence that certain yoga poses can help reduce the curve of your spine (see Side Plank Pose (Vastithasana) Could Reduce Spinal Curves in People with Scoliosis!). Work with a yoga therapist or teacher who is an expert in your condition to find the poses that are right for you.

Subscribe to Yoga for Healthy Aging by Email ° Follow Yoga for Healthy Aging on Facebook ° Join this site with Google Friend Connect

How To Use Mass Gaining Supplements To Your Advantage

Using mass gaining supplements properly will help you obtain the muscle mass you’ve been looking for. For many, building muscle will not be as easy as one may think. It’s important to remember that building muscle will take time and commitment on your part. It will also take a great effort when it comes to strength training. In addition to these, it will be important for you to focus on the different types of supplements that are available on the market which will allow you to build muscle mass in a shorter length of time.

As a person that is trying to put on weight, sometimes you will not get the gains you’ve been looking for in the amount of time you had hoped. You are not alone. They’re a lot of individuals out there who have been trying to gain muscle, and have experienced minimum gains over a long period of time. The good news is – there is hope. This hope comes in the form of mass gaining supplements. These supplements have been specifically designed to help you gain the muscle mass you’ve been looking for in a short period of time.
 Mass Gaining Supplements


Not only will you experience muscle growth, but this muscle growth will contain the nutrients your body requires in order to sustain this growth over time. Now, it’s important to remember that using amass gaining supplement properly will be extremely important. There are a lot of products on the market today that have been given a bad name simply because they do not provide the results they claim. It will be extremely important for you to do the homework required in determining whether or not a supplement will provide the necessary gains you’ve been looking for in a timeframe you’re comfortable with.

Now, it’s also important to understand that many of the supplements you will find are different. In general, there are four main ingredients found in supplements such as Creatine, caffeine, protein, and amino acids. There are some supplements that provide all four of these different ingredients but in different amounts. Depending on the type of gains you are looking for, it will be important for you to choose a supplement that has been specifically designed to help you increase muscle mass, energy, weight gain, or certain types of protein blocks. If you aren’t sure of the type ofsupplements used to gain the mass you require, it will be important to do more research on your part to find out which will work the best.

You will discover that by using the information provided above, this will help you in your efforts to learn more about supplements, and how they can help you in your muscle building efforts. Remember, it takes commitment and determination on your part to get the results you have been hoping for. With the right type of strength training and the proper diet, you will be able to produce excellent gains overtime. If you would like to shorten this time frame, it will be important for you to incorporate mass gaining supplements within your overall strength training diet plan.

4 Muscle Building Tips for a Skinny Body

There are many muscle building tips for a skinny body that are available out there that can easily confuse you. There are all correct to some extent when it comes to gaining mass. However, most of them are not tailored to a specific body, which in this case is… A SKINNY BODY. Here are 4 muscle building tips that skinny guys absolutely must apply to gain mass even that much faster.

Counting calories will actually make things easier

Have you heard of skinny people complaining about how much of food they eat in a day, and yet they fail to gain any reasonable pounds? Well, that’s because it’s NOT ENOUGH. They might think of it as a lot. But it’s not about what they think. It’s about facing the numbers called “calories”. Never assume the amount of calories you put into your body. Know your number. If you don’t see the results you want, adjust it either by adding or subtracting from it.
Muscle Building Tips for a Skinny Body

Go hard, or GO HOME

If you want to grow big, gain mass, and sculpt a rock hard physique, you’re going to have to push yourself to overcome boundaries. It’s time to get aggressive with your body, especially in the GYM. You don’t want to visit the gym and work your body out like most people do to keep fit. Have the mentality that you’re going for a muscle mass training thaat’s going to give enormous growth to your body. Use terms like “pumping IRON”, “HIT the gym”, and “blast my GUNS” in your vocabulary to give you that extra PUMP before HIITING the gym.

Transformation targets you set for your own body

Always know where you’re heading before starting on your body transformation journey. Most of us neglect setting an end goal for muscle building, which is probably due to the fact that we know we’re not going to achieve it. We train for a week or two, and if we don’t see ourselves shaping like The Rock, we THROW IN THE TOWEL. Is the end goal not realistic enough? Of course not. You just need to break down your weight goals for every 2 weeks, which sounds simplistic, but it’s true. Start hitting your minor weight goals every 2 weeks, and you’ll be your own ROCK by the time you know it.

It’s all about the beach, it’s all about the GIRLS

Remember to celebrate when you’re done! Some guys spend so much time worrying about getting that muscle man physique that they don’t realize, THEY’RE ALREADY THERE. It’s time to show your body off by going to the beach, and trust me… heads will turn! Every once in a while, you’ll get some beautiful ladies coming up to feel that rock solid abs, or those huge guns. Either way, you need to be proud of what you’ve achieved. Don’t hide your physique under loose shirts. Don’t be afraid to show your size now. You’ve earn it!

The Top Exercises For The Bicep Muscle

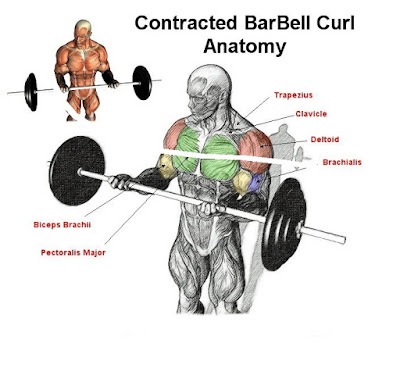
Standing Barbell Curl

Hold the bar with your palms facing out, curl the bar slowly up until it touches your chest, slowly lower down again.
Remember not to cheat as you curl the weight as this takes the emphasis off your biceps and onto your waist, the point is to work the biceps and slow deliberate curls are the trick.
Variations include machine curls or preacher curls.

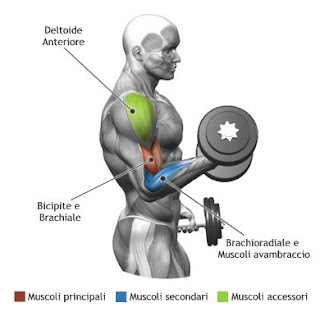
Standing Alternate Dumbbell Curl

Hold a dumbbell in each hand, curl one up to your chest and lower it, then curl the other up and lower that one. Repeat.
The point of alternate curls is to focus on each arm separately and to also give the other arm a slight rest before you repeat again.
Variations include holding the dumbbell with your palms facing toward your body and keeping them there throughout the movement.

Seated Alternate Dumbbell Curl

Same as standing alternate curls except you are seated on a bench, perform the movement just as you would standing.

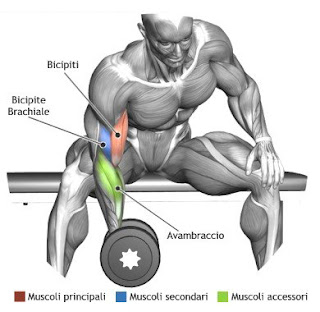
Concentration Curl
Concentration Curl

Sit on a bench, hold a dumbbell in one hand between your legs with that elbow resting against your inner leg and hold on to your knee with the other hand. Slowly curl the weight in your hand up to your chest and lower slowly.
This exercise is great to really squeeze your biceps at the top of the movement.
Repeat for the other hand.
Alternates to the exercises described here are those done with cables. The can be switched with any of the exercises I mentioned here.

Thursday, February 25, 2016

Techniques for Managing Pain with Yoga

by Baxter and Nina
Beams of Light by Melina Meza
This post recommends techniques for helping you manage acute and/or chronic pain. Although the causes of acute and chronic pain differ, depending on your condition on a given day, you can use similar techniques to reduce your pain.

Start by considering your pain levels both today and, if you are suffering from chronic pain, over time. By reviewing your pain levels through the course of a day, week, or month, you will begin to see patterns. To do this, you might find it useful to assign a rating to your pain and keep a journal of pain levels that you can periodically review. To get a better picture of how pain is affecting your entire being, you could also note your stress levels and your predominate mood. You can then use all this information to guide you to practice differently on different days. 

For chronic pain, on high pain days, start or stay with gentle poses, relaxing breath practices, and meditation. If your pain is very severe, focus on relaxation and breath practices, and maybe imagine the poses. And on low pain days, try carefully increasing the intensity of your practice.

For acute pain, if your pain is tolerable, this is a good time to practice asanas, which will increase oxygen flow to brain and muscle tissues, and release held tension from the muscles. But if your pain is severe, you should focus solely on relaxation and breath practices. 

For everyone, practicing stress management on a regular basis is very beneficial, as reducing stress levels can lower pain levels. We will compare and contrast some of the techniques below. 

How Often to Practice. For chronic pain, it is important to have rest days, where you are practice only restorative or extremely gentle poses, or skip the asana portion of your practice entirely. So we recommend that you practice more actively 3 to 4 times a week, and at least do breath practices and meditation on your resting days, if possible. 

For acute pain, follow a similar schedule. Because acute pain will ideally resolve more quickly, as your pain subsides and your functioning returns to normal, you can gradually increase your practice days to 5-6 days a week. 

Balanced Practice. We recommend that your active practice be a well-rounded one, including yoga poses from all the basic groups (as long as they are appropriate for you unique pain situation), in both dynamic and static variations. In addition to your poses, try to include breath work, resting poses, and mediation. Because down-regulating your sympathetic nervous system is so beneficial for pain management, we recommend that at least 25 percent of your practice be devoted to breath work, restorative poses and/or meditation.

For both types of pain, always begin your asana practice with gentle poses. Start with simple movements that improve breathing, such as Cat-Cow pose, seated or standing side-bends, and arm range-of-motion actions. Then, if you are feeling up to it, add in more active asana, dynamic or static, such as Arms Overhead pose, Warrior 1 and 2 poses, Downward-Facing Dog pose, and Locust pose, and any other basic poses that work well for your particular condition. Finish up with one or more relaxing restorative poses, such as Easy Inverted pose, Legs Up the Wall pose, Supported Child’s pose, or Supported Relaxation pose. 

Dynamic Poses. Use dynamic poses either to create a balanced practice or to address a particular area where you have pain. When you first try a dynamic pose that may stimulate the area of your pain, move slowly and mindfully in and out of the pose. If this movement stimulates pain, modify it so you come up to the edge of pain without fully triggering your pain response. When you find a way to practice that feels safe, you can move at a pace that feels good to you, be it slower or slightly faster.

Static Poses. Use static poses to stretch areas that are stiff and tight, and, if you have chronic pain, that may have developed limited mobility as a result of pain. Focus on the particular flexibility poses that will gently stretch your tight areas. For example, if you have low back pain and are tight in the backs of your legs, Reclined Leg Stretch could be a good choice. 

Also use static poses to strengthen muscles that have been become weak due to lack of use. For example, chronic low back pain often results in weakness for the lower back muscles. Focus on strength building poses that will gradually build strength in your weak areas, For example, for weak lower back muscles, choose poses that builds back strength, such as Locust pose, to regain lost strength.

As you work with both flexibility and strength building, practice mindfully and note if these poses also begin to reduce pain levels. If they do reduce pain levels, continue practicing the poses and gradually add in other similar poses. However, if they don’t reduce your pain levels, try reducing the time in each pose or consult with an experienced teacher to help you re-organize your practice choices.

For acute pain with no history of chronic pain, practicing strengthening poses is less important, because it takes time for weakness to develop. However, if the acute pain becomes chronic, we recommend adding strengthening poses to your practice to help prevent weakness from developing.

Breath Practices. You can use any breath practice you find helpful. Generally, we recommend starting with calming breath practices, such as:
  • gently lengthening both inhalation and exhalation
  • 1:2 ratio breathing
  • alternate nostril breath
When you reach a point where you are working on stress hardiness or active strength building practices, you could try adding in a few more stimulating practices, such as 2:1 ratio breathing or Kapala Bhati, as these practices can help energize your body and mind, contributing to your strength and endurance. 

Restorative Poses & Focused Relaxation. All forms of focused relaxation are helpful for reducing stress. However, if you are in acute or severe pain, you may find recorded guided versions are easier to focus on, as your mind will be more attentive to the recording than your own attempts at moving your focus away from pain. 

In general, start with a comfortable relaxation pose, from simple Savasana (Relaxation pose) to any form of supported Savasana, or any symmetrical restorative pose. Then practice any conscious relaxation technique that works for you, such as simple breath awareness, a body scan or guided imagery, or the rotation of consciousness portion of yoga nidra. 

Meditation. For both acute and chronic pain, you can practice any form of meditation, from simple breath awareness to more formal practices that cultivate feeling of kindness towards your self. We especially recommend meditating on an image in your mind that is calming and joyful or a color that is peaceful and pleasant, or using the formal Vipassana Metta meditation (Loving Kindness Meditation). To get a handle on how much of your mental energy is going to thinking about your pain versus other topics, you can try simply observing your thoughts. Experiment with these various different techniques to see what works best for you (see Yoga Meditation Techniques).

Imagining Asana. For those with chronic pain, on days when you don’t feel up to moving, imagining you are doing an asana actually prepares your body to move with greater ease and comfort when you are ready to move again. To prepare yourself to do this, you may want to rehearse this technique on a low pain day while you are actively practicing. For example, as you using whatever method you normally use to practice, whether using a sequence from a book, a video, or an audio recording, or creating your own sequence, after each pose, stop, close your eyes, and do the pose or mentally, as a way of memorizing it. Then, the next day, try out a short practice mentally. As you improve at this technique, you will be able to easily access the mental practice on the days you don’t feel up to moving.

Subscribe to Yoga for Healthy Aging by Email ° Follow Yoga for Healthy Aging on Facebook ° Join this site with Google Friend Connect


Wednesday, February 24, 2016

Building an Upload Microservice using AWS Lambda

One of Bodybuilding.com’s core missions is to help people transform their lives through the adoption of a healthy lifestyle and exercise. One way we motivate people to begin such a journey is through our yearly “transformation challenge.” Over the course of 12 weeks, participants in the challenge are encouraged to adopt a training plan and set new habits that will lead to a fitter, healthier body. Prizes are awarded to the people who make the most profound transformation over the course of the contest. 

In order to participate, contestants are required to upload photos of themselves before and after the challenge. As one might imagine, the time period shortly before and shortly after each challenge tends to produce a spike in photo-upload traffic to our servers. Historically, these periods have been problematic for the scalability of our backend systems. In order to improve our end-user experience (not to mention our own), we decided to re-architect our photo-upload system in late 2015.

This tech talk describes how we created a new microservice-based architecture using Amazon Web Services technologies as well as a Java/Spring stack. Our goal was to greatly improve our ability to handle spikes in image-upload traffic without manual intervention. As a result, we created autoscaling RESTful services using Spring Boot and AWS Elastic Beanstalk. Image-processing logic has been encapsulated into highly scalable Amazon Lambda functions.

We recently launched the 2016 transformation challenge. With our new image-upload infrastructure in place, we have been able to handle peak loads without a hitch.


Working with the Witness

by Beth
Layer of Earth by Kazoo Shiraga*
As we age, we change. Wrinkles and gray hair appear, muscles begin to lose mass, and our relationship to society can change. In some cultures aging earns us status as wise elders to be revered; in others we are ignored or seen as no longer having value. Also, we may begin thinking about end of life issues, seeing death as loss, something to fear, or as a natural transition to something else (the something else often depends on our culture, country, family or spiritual beliefs). However, no matter who we are or where we live, cultivating and enhancing awareness and the ability to witness “what is” will enable us move through our aging process with integrity.

A simple definition of awareness is: knowledge or perception of a situation or fact. Awareness is at the heart of any definition of yoga. Practicing this becomes especially important to anyone who has ever stepped foot on a yoga mat or sat on a meditation cushion. You can read about Nina’s experience with awareness in her post The Power of Svadhyaya (Self Study).

The science of yoga offers many tools to cultivate awareness. Working with the Witness is a good one to consider. The Witness is the aspect of self that allows us to see ourselves in action as we are acting. The kosha model of yoga psychology focuses on five levels of awareness and is my go to context for working with the Witness. I’ll list them all separately here to talk about them but they are all ultimately one interrelated system. The five levels are:

1. Physical Level (Annamayakosha). This is the level that we experience through all of our senses including sight, hearing, taste, touch and smell. The ability to become aware of body sensations is a key step in activating the Relaxation Response and the healing process. This is the level that most people readily relate to and the level most focused on through yoga asana.

For me, working with the Witness helped me connect the dots between discomfort in backbends, such as Locust and Half Wheel, and headaches that followed a day or two after practicing. That awareness led to an appointment with a sports medicine doctor, who diagnosed me with spondylolisthesis. So I’ve been modifying my back bends and was delighted to read Shari’s post about spinal movements All About the Spine, which confirmed my experience. 

2. Breath-Energy Level (Pranamayakosha). Breath is the vehicle for the entry of oxygen and life energy, or prana, into the body. Learning to breathe effectively and efficiently is one of the most important lessons in yoga. When we are aware of our breath and how we breathe, we can better manage our moods and states of mind. This is key to managing stress and remaining calm no matter what is happening. 

3. Mental-Emotional Level (Manomayakosha). Mental awareness is based on what we perceive through our thoughts and feelings in two ways: 1) by analyzing and organizing our knowledge and experiences and 2) by intuition, hunch, inner voices, images, instant knowing, and fantasy. Emotional awareness helps us perceive and understand our habits, patterns and life lessons. 
By witnessing my periodic “blue funk days” while in the middle of them, I’ve discovered something interesting. When they lift—and so far they always do—I often experience intuitive flashes that result in writing ideas, home decoration projects, and themes for my yoga classes, or those AHA! moments that lead to new understandings. I’m now aware of them as they make their appearance and I’ve learned to “ride the emotional wave” instead of trying to cut it short. 

4. Wisdom-Witness Level (Vijnyanamayakosha). The Witness is the lamp that illuminates all aspects of ourselves (persona and shadow) for integration and acceptance. When we are able to witness our thoughts, emotions, and behaviors without judgment, we can cultivate and deepen our ability to recognize our patterns and consciously choose to make changes. 

5. Bliss Level (Anandamayakosha). This is unity consciousness, going with the flow of life whether positive or difficult. It is direct experience of the universal energy or connectedness that we can tap into through consistent practice, which we control, and grace, which we do not control. 

One tool to wake and work with the Witness is the body scan. The technique focuses on engaging and deepening awareness at all levels of being to promote healing (as opposed to curing, which may sometimes be a happy side effect). Depending on your needs and readiness, body scans will focus on some or all of the koshas. There are many techniques and ways to practice this, and you can learn to self-guide. 

Here is a short self-guided script that you can practice in any comfortable position. First, make an intention to witness whatever arises without judgment and then gradually move your awareness through your body, breath, and mind as you say the following to yourself:

I am aware of my feet, ankles, lower legs, knees, upper legs, hips, waist, belly, low back, rib cage, mid-back, chest, upper back, shoulders, neck, face and the top of my head. (Pause) 

From the top of my head awareness moves over my face, down my neck, out over my shoulders and down my arms to my hands and fingers. I welcome any sensations or information I receive. (Pause) 

I notice my breath and watch the inhalation and exhalation. The breath comes and goes naturally, not changing in any way. Where is the movement of the breath felt? In my belly, chest, throat, nostrils? (Pause)

I watch the ebb and flow, the rise and fall, the in and out of the natural, essential breathing process. I am totally aware of my breath and my breathing. (Pause) 

Now, I move my attention to the mind and my thoughts. Do they flow easily from one thing to another or are they fixed on one thing? (Pause) 

Are they focused on the past or do they center on the future? (Pause) 

Can I see each thought, simply rising and passing one by one? Can I be aware of thinking while I am thinking? (Pause) 

I am now calm, relaxed, and aware. I rest in myself, breathing slowly and deeply. (Pause and rest here as long as you like)

Personally, I find this useful for grounding during stressful times, and it works like a charm those fortunately rare nights when I have trouble falling asleep. With practice, you can lengthen or shorten your explorations. Or you can begin the practice with prepared recordings. A little research will turn up many options. Voice, pace, length, tone, and content vary. Most will allow you to sample your choice before you buy. Be sure to pick one that feels just right for you.

With practice we learn to become aware, or conscious, of ourselves on all levels of our being. We can then bring clear and focused attention to what we find; accept and integrate all aspects of the aging process, pleasant and not so pleasant, and if we chose make conscious changes that bring us into alignment with our individual lives. Working with the Witness helps us move through our aging process with strength, flexibility, balance, wisdom, and grace.

Subscribe to Yoga for Healthy Aging by Email ° Follow Yoga for Healthy Aging on Facebook ° Join this site with Google Friend Connect


Deltoid exercises – Learn how to build shoulder muscles

The common phrase “ to carry a weight on your shoulders”  is more true than you think, shoulders top off any great physique, they are the muscles that show up even in a big jumper, they widen your upper body and stronger shoulder muscles means a stronger you.
The shoulder muscle is comprised of three different heads of muscle.
These consist of;
Anterior (front) Deltoid : This head lifts the arm to the front.
Medial (side) Deltoid : This head lifts the arm out to the side.
Posterior (rear) Deltoid : This head lifts the arm to the rear.
To develop full wide deltoids all three heads need separate attention as well as heavy compound work.
The best way to work the shoulders is to design a workout that includes two heavy compound movements and an isolation movement for each of the three heads.

Here are the top exercises for the Shoulder muscles

Standing/Seated Barbell Press

This is one of the best compound movements for adding mass to your front and side deltoid muscles. This move also works the triceps.
Stand or sit on a bench and lift the barbell up to the top of your chest to begin the movement. Press the weight directly upwards and lower it down again, repeat for the next rep. Do the move slowly to insure you get the best from it.
Variations include executing the press with the barbell behind the neck, this variation works the two heads slightly different that in front of the neck. This move might be uncomfortable for some people so if you feel as if it is causing you discomfort then simply do the presses to the front.

Standing/Seated Dumbbell Press

Like the previous exercise except that you use two dumbbells instead of a barbell. You get a greater range of motion when you use dumbbells than the bar.
Hold the dumbbells at shoulder height, press them upwards under control and lower them to shoulder height again, repeat for the next rep.
Consider using a spotter to help you lift the dumbbells to shoulder level and to also help you if you feel you need a little extra help towards the end of the movement.
Variations include using the smith machine to press a weight overhead.

Bent Over Rear Raises

This isolation movement works the rear deltoids.
Hold a dumbbell in each hand, bend over at the waist until your torso is almost parallel to the ground and the dumbbells are held freely straight down in front of you. Keeping your head up and your back straight raise the dumbbells up and backwards in an arc until your arms resemble a pair of wings. Slowly return the dumbbells to the start again.
Variations include rear raises done with cables.

Alternate Front Raises

Front raises are an isolation movement that work the front deltoid. Stand with a dumbbell in each hand. Raise one in front of you in an arc until it’s shoulder height, slowly return it to your side again, repeat for the other arm.
Variations include the movement done with cables and also the movement done seated.

Side Raises
Side Raises

Side raises are an isolation movement for the side deltoids.
Stand with a dumbbell in each hand. Raise both dumbbells out and up straight to either side in an arc. Pause at the top and slowly return the weights down to the side under control.
Variations include the movement done with cables and also the movement done seated.

Upright Row
Upright Row

The upright row is a compound movement that works the front deltoids and also the trapezium.
This can either be done with a barbell or dumbbells. Stand up straight holding the weight in front of you at your waist. Lift the weight straight up and as you do your hands will rise to your shoulders and your trapezium will shrug with the movement.
Remember, this movement might not be comfortable for some users or those who suffer from a shoulder condition so if it hurts then omit it from your training program.

Tuesday, February 23, 2016

Can We Delay Aging?

by Brad Gibson, Ph.D.
The Damsel of the Holy Grail
by Dante Gabriel Rosetti
“No, we cannot “prevent aging”… but what if we could delay it?

Unfortunately, the deterioration that comes with aging is part of a fundamental aspect of the universe, so it cannot be eliminated. Recent research suggests, however, that the rate of deterioration is indeed malleable, at least in many different animal models. So why not in people?” — Dr. Felipe Sierra


Dr. Felipe Sierra's post Can We Delay Aging? on the Next Avenue site is a reasonable and thoughtful response to what is actually a very difficult question. While, some researchers in the aging field have gone so far as to talk about extending one’s life to 200 years or more, or even becoming immortal, Dr. Sierra sidesteps these assertions and instead tackles the more practical, and the less politically charged issue, of targeting an increase in “‘healthspan,” or what is known in the field as “compression of morbidity.”

“Traditionally, research on aging has focused on longevity, but we all recognize that longevity without health is a hollow goal. As the field has matured, we are paying more attention to healthspan — the proportion of lifespan spent in reasonably good health.

Many of the interventions identified in animals lead to improved healthspan. Not only do the animals die later, they die with fewer diseases and debilitating conditions than their control counterparts. This suggests that, at least in mice and other species, it might be possible to attain the Holy Grail of aging research: compression of morbidity.”

This “compression of morbidity” hypothesis, first proposed by James Fries at Stanford Medical School back in 1980, states that the “Extension of adult vigor into a fixed life span compresses the period of senescence near the end of life” (J. F. Fries, The New England Journal of Medicine July 17, 1980). From the NIH and governments budget perspective, this is a laudable goal, as it would potentially lead to less healthcare expenditures in the later years of one’s life, which currently consume over 50% of all medical costs. It would also have the obvious advantages of reducing chronic illness and diseases associated with aging, such as cancer, Alzheimer’s disease, and diabetes.

But can it be achieved? Evidence in model organisms from worms to flies to mice suggest that many of the underlying molecular pathways that appear to have an effect on the lifespan of an organism also tends to improve other phenotypic traits, such as movement, and cognitive and behavioral functions. This is important, as many of the early studies just examined lifespan extension in these model organisms without a close examination of whether there was also an increase in the health or robustness of the organisms. Clearly, the last thing we want to experience for ourselves is an increase of 10-20 years of our lifespan if it was to be lived in a chronic state of debilitation. And while we all know that improved exercise and diet can have significant effect on our health or robustness, the question of whether this will lead simply to an increase in our lifespan but not a compression of morbidity or an increase in our healthspan. 

The jury is still out with respect to unequivocal evidence of the compression of morbidity hypothesis, but several published studies suggest that it may be achievable. Indeed, the term “geroscience” that Dr. Sierra invoked in his essay as a new field of research devoted to answering this question was first coined by scientists at my own institute, the Buck Institute for Research on Aging. It was the title of a successful NIH proposal, “Geroscience” to the NIH to “support interdisciplinary approaches to solving significant and complex biomedical problems, particularly those that have been resistant to traditional approaches.” The essential notion of geroscience was that processes that drive aging and the diseases of aging overlap. And if we are to make any real progress in understanding aging, scientists need to study age-related diseases in the context of aging in a truly interdisciplinary manner. 

This may seem like an obvious statement, but most basic science research into diseases that occur late in life were not, and are still not, conducted with aging as a major variable in the overall experimental design. For example, the vast majority of studies of neurodegenerative diseases, such as Alzheimer’s or Parkinson’s diseases, where mouse models were used, the age of the mice were typically 6 months old, or about late-adolescence in human terms. But this is changing, and there is now an emerging consensus in the scientific community that we need to study these diseases in aging models to gain the insight we will need to find cures. So where are we in this process? Dr. Sierra concludes by saying:

“When will people benefit from this?

It is definitely too early to say, which is why I have refrained from even mentioning the interventions that work in animals. So, despite the thriving industry of “anti-aging” treatments, nothing that we know of today has been shown to prevent or delay the aging process in people. Thus, the current generation may not benefit from this groundbreaking research. But maybe our children and grandchildren will.”


Indeed, there are no anti-aging treatments available today that have proven effects on delaying aging despite some interesting studies in animal models. And I mostly agree with him that progress will be slow and we are unlikely to benefit from this basic research in our own lives. So in the meantime we are left with what we know can affect our general health: diet, exercise, reducing stress, etc. So instead of waiting for the miracle cure or fountain of youth—when and if it ever comes—there are plenty of non-pharmacological ways to improve your health, whether or not that they will delay the rate of your aging.

Subscribe to Yoga for Healthy Aging by Email ° Follow Yoga for Healthy Aging on Facebook ° Join this site with Google Friend Connect

Monday, February 22, 2016

Video of the Week: Cow Pose to Child's Pose

This mini vinyasa warms up your spine, hips, and knees. Add as much padding for your shins and ankles as you need to stay comfortable.
Subscribe to Yoga for Healthy Aging by Email ° Follow Yoga for Healthy Aging on Facebook ° Join this site with Google Friend Connect

Calves Muscles – Exercises for your calf muscle

Most people who lift weights tend to neglect their calves but if you want a complete, fully developed and admirable body then you shouldn’t neglect your calves. They are hard to train and it does hurt to do it but the results will show if you train them as hard as you do your chest or biceps
You need to train your calves at different angles with heavy weights.

Here are the top exercises for the calf muscles
Calves Muscles

One Legged Calf Raises

Stand with one foot on the edge of a board. Hold on to a weight in one hand and hold on to a stationary object with the other hand. Lower your heel of the board until your calf if fully stretched. Then lift your foot until you are standing on your toes as high up as you can.
Repeat for the other foot.

Barbell Calf Raises
One Legged Calf Raises

Stand on a board with both your feet. With your heels over the edge of the board and a barbell across your back lower until you stretch your calves. Higher yourself up with your calf muscles until they are fully contracted.
Variations include using different foot positions to fully maximise calf development.

Seated Calf Raises
One Legged Calf Raises

Using a seated calf machine place your knees under the bar and place your feet on the board with your heels over the edge.
Stretch and contract your calf muscle like before to fully work them.
Variations include working the feet one at a time.

Saturday, February 20, 2016

Mens Chest Workouts – Most effective chest workouts

A flattering body part for men who have developed a full muscular chest.
The chest actually consists of upper and lower portions. You need to include flat, decline and incline bench movements to fully develop the upper, middle and lower chest.
Also to target the middle and outer areas requires a variety of exercises which I will cover here.
To develop the chest initially you should use mostly free weights and compound presses.

Here are the top exercises for the chest muscles
Chest Workouts

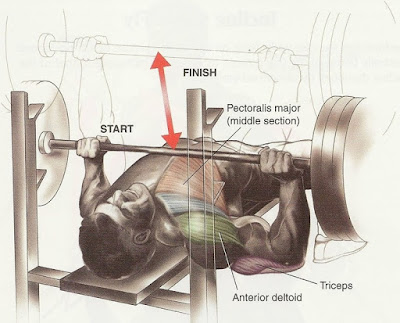
Bench Press – Flat
Bench Press – Flat

The bench press is fundamental in a training regime to build mass in the chest, front deltoids and triceps.
Lie on a bench with your feet on the floor. Grasp the bar a little wider than shoulder width.
Lower the bar to your chest slowly, DO NOT rest the bar on your chest. Press the weight up again until your arms are extended with a slight bend at the elbow.
Remember to have a spotter present when you are attempting to press heavy weights.
The bench press works all areas of the chest.
Variations include machine presses.


Incline Bench Press

Incline Bench Press

This is just like the bench press with the exception of having the bench at an incline angle of your choice. Remember the higher the angle the more your front delts are coming in to play.
The incline press focuses on the upper chest area.

Decline Bench Press
Decline Bench Press


The decline press is done on a decline bench so that your upper body is angled downwards.
This works the lower area of your chest.
Its especially important to have a spotter present with decline presses as its much easier to get into difficulty.

Dumbbell Press
Dumbbell Press

The dumbbell press is done on a bench but its done with dumbbells instead of the barbell.
It works the chest muscle through a greater range of motion than using the barbell alone. And using two separate weights forces the stabiliser muscles to work too.
Hold two dumbbells in your hand while sitting on the end of a bench, sit back and bring the dumbbells straight up overhead.
Lower the weight towards your outer chest slowly and under control. Press the weight back up again to finish the rep.

Incline Dumbbell Press

Like the incline bench press only using dumbbells.
This exercise works the middle and upper pectoral muscles.

Decline Dumbbell Press

Again this is like the bench press version only with dumbbells.
This exercise works the middle and lower pectoral muscles.

Push Up
Push Up

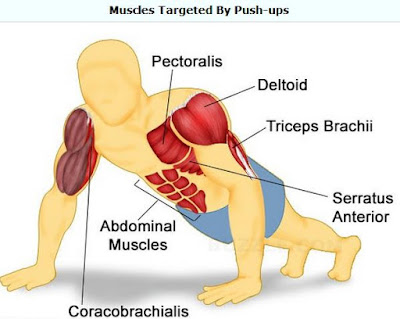
The push up can be performed anywhere you have floor space. It requires no equipment and is useful when travelling.
Kneel down on the floor, place your hands in front of you on the floor and lift up your knees until its just the tips of your toes on the floor. Lower your upper body until your chest almost touches the floor, push yourself up again and repeat.

Dumbbell Fly’s
Dumbbell Fly’s

Lie on a bench and hold two dumbbells at arms length above you , palms facing each other. Keeping your arms straight, lower the weights out to the side of you in an arc motion. Stop short of parallel and using your chest muscles bring the weights together again in an arc motion.
Remember to keep a slight bend in the elbow joint as you move through the movement to prevent injury to the joint

Dumbbell Incline Fly’s

Dumbbell incline fly’s are a variation on flat fly’s. Using an incline bench repeat the procedure as for flat dumbbell fly’s.

Dumbbell Decline Fly’s

Dumbbell Decline Fly’s
Again decline fly’s are a variation on flat fly’s. Be sure you have a spotter present to watch you don’t strain yourself in an awkward position.
It might also be a good idea to have the spotter hand you the weights after you get yourself into the decline position.
Variations on dumbbell fly’s are fly’s done using cables such as standing cable fly’s and bench cable crossovers.
Also machine fly’s are useful as well. The add that element of safety also to the exercise.

Dips
Dips

Dips have a similar effect as decline presses. Dips are done using your own body weight. As you become stronger you can add more weight by holding a dumbbell between your feet.
Hold onto the parallel dip bars at arms length. Slowly lower yourself as far as you can down. Press back up to the starting position from there.
To lean further forward and involve more of your chest, cross your feet behind you which causes the body to lean forward during dips.