How Much Protein You Need and

Pro Bodybuilders eat about one gram (sometimes even 1.5 grams) of protein per pound of body weight or per pound of non-fat tissue. I'm sure you've seen that the recommended dail

Comments

Showing posts with label Mountain pose. Show all posts

Wednesday, May 18, 2016

Featured Pose: Mountain Pose (Tadasana)

by Baxter
Many yoga traditions consider Mountain pose to be the original standing pose, from which all the other standing poses emerge. So mastering this pose helps you perform all the other poses. This pose is also an ideal, active standing position that supports healthy overall posture, teaching you healthy alignment of your pelvis and spine over your feet, and your head over your torso. It also cultivates strong legs, an even balance between your feet, and an even opening in your chest and your upper back.

Baxter prescribes this for:
  • Improving posture 
  • Low back pain
  • Improving balance 
  • Text neck or head forward syndrome
  • Weakness in the legs or spine
  • Resting between standing poses
  • Standing meditation pose
Timing: If you are an experienced practitioner, hold the pose for 1-2 minutes. If you are new to the practice, start by holding this pose for 30 seconds at a time, working up to 1-2 minutes over time.

Cautions: This pose is generally very safe and accessible. If you have trouble with balance, step your feet wider apart and/or practice with your back near a wall. 

1. Classic Version
Stand with your feet hips-distance apart and parallel to each other. Distribute your weight evenly on your feet and actively firm your upper thigh muscles evenly toward your thighbones. From your tailbone, lengthen upward through your spine to the crown of your head, as if you were growing taller. Without squeezing your shoulder blades together, widen the front of your chest so your chest and your upper back are both broadening. Position your head directly over your shoulders, with your chin parallel to the floor. Either relax your arms at your sides or actively reach down from your shoulders into your fingers, with your palms facing your thighs. 

As you maintain these internal actions, gently lengthen your inhalations and exhalations, while remaining active and alert. To come out of the pose, simply relax the physical effort of Mountain pose and notice the posture your body returns to. If desired, repeat the pose one more time.

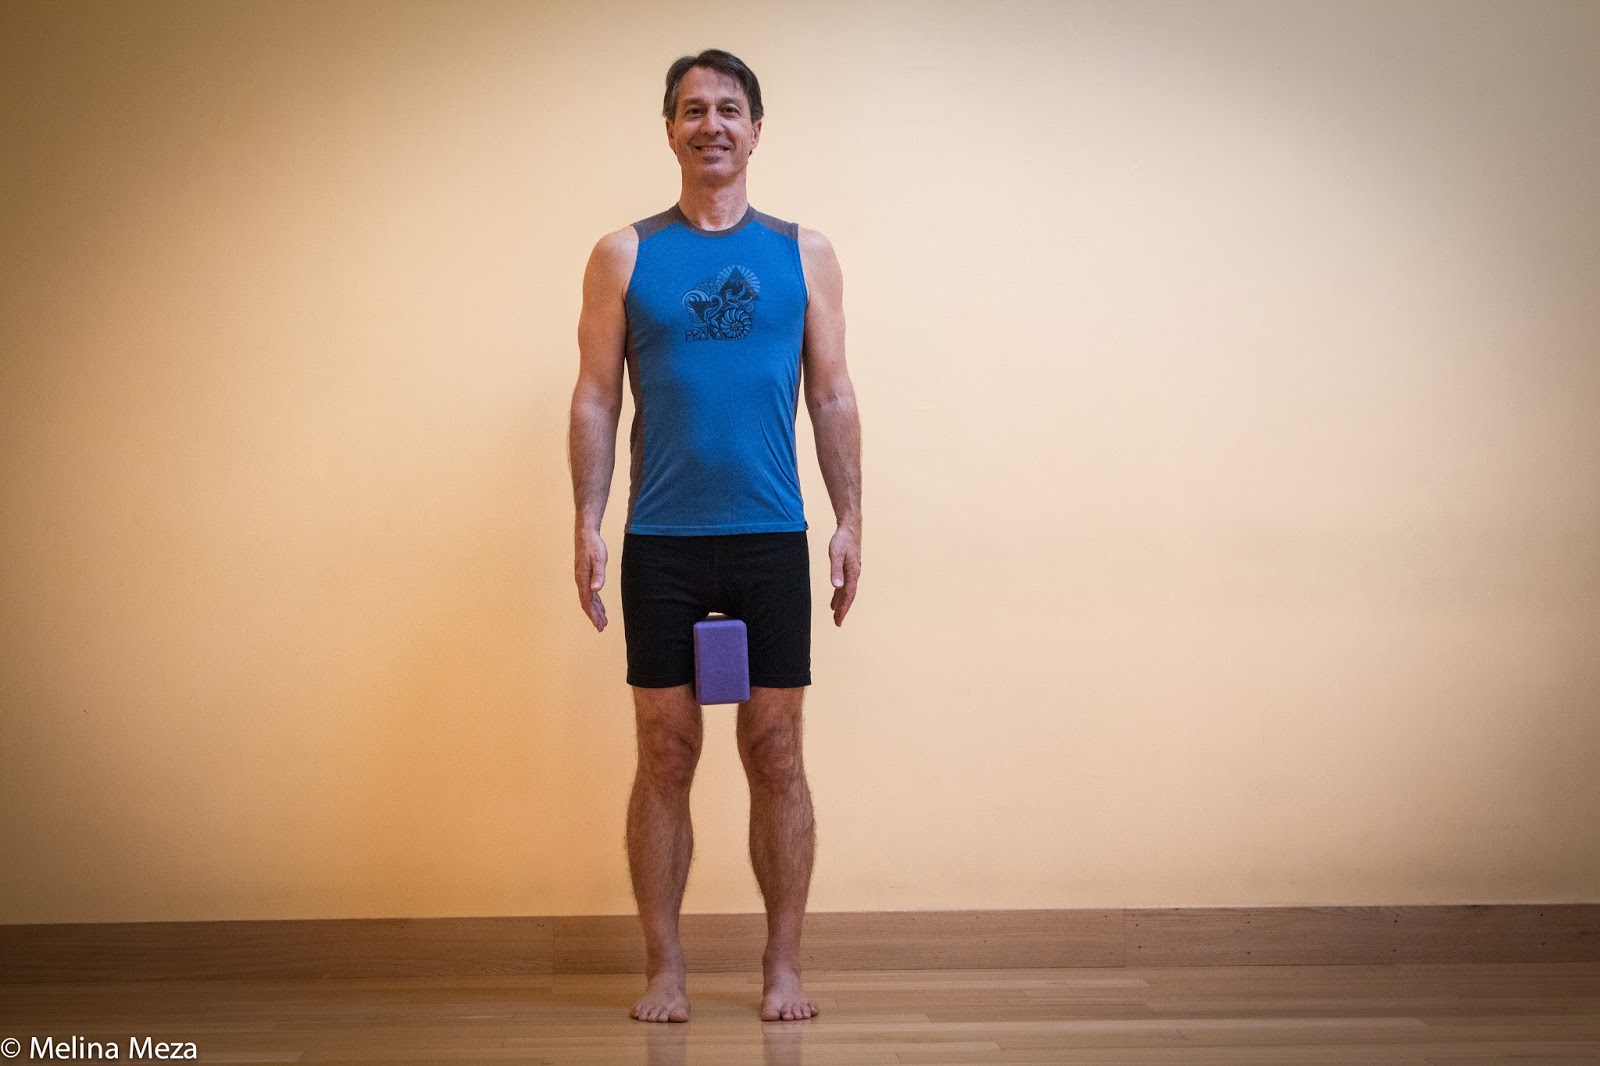
2. Block between Thighs
This variation strengthens and brings awareness to your legs, especially your inner thigh muscles, which are often weaker than your other leg muscles. 

Start by taking the classic version of Mountain pose. Next, place a block on its narrowest width between your thighs, half way between your pelvis and inner knees. Step your feet a bit closer together. Then firm your legs into the block while lengthening down into your feet. If you tend flatten your lower back, roll your thighs in and push the block back slightly to encourage a normal lumbar curve. If you have a sway back that is painful, squeeze the block and draw your tailbone down slightly towards the block. 

Follow the leg, spine, chest, and head instructions for the classic version, and use the same breathing technique. To come out of the pose, remove the block and relax your physical effort, especially your legs. 

3. Reverse Prayer Position
This version opens your front chest, opens your shoulder joints for taking your arms behind your back, strengthens the muscles between your shoulder blades, and stretches your forearms and wrists.

Start by taking the classic version of Mountain pose. Bring your palms together into Prayer position (Namaste) in front of your chest and firmly press your palms together. Next, keeping your elbows bent, bring your hands together behind your back, with your fingertips pointing down. Move your hands a few inches out away from your lower back, and spin your fingertips up toward the your head. With the sides of your hands lightly touching your lower back, wriggle your hands up the line of your spine as high as you can comfortably go or until your palms come completely together. If your palms come together, bring your thumbs together as well. 

Follow the leg, spine, chest, and head instructions for the classic version, and use the same breathing technique. 

Hold your arm position for approximately 30 seconds, gradually working up to 1-2 minutes over time. To come out of the pose, carefully wiggle your hands down your back at least six inches and then release your hands down by your sides. Shake out your hands and arms before moving on.

4. Elbows Clasped Behind Back

 Like version 3, this version opens your front chest, opens your shoulder joints for taking your arms behind your back, and strengthens the muscles between your shoulder blades, but this version more accessible for most people.

Enter the pose like version 3, but instead of bringing your palms together behind your back, bring your just your right arm behind your back. Then bring your left arm back and, depending on your flexibility, clasp opposite elbows or forearms. Follow the leg, spine, chest, and head instructions for the classic version, and use the same breathing technique. 

Hold the arm position for 30-60 seconds and then release your arms. Repeat the arm position on the left side by taking your left arm back first. After finishing both sides, shake out your arms before moving on. 

Subscribe to Yoga for Healthy Aging by Email ° Follow Yoga for Healthy Aging on Facebook ° Join this site with Google Friend Connect


Friday, May 3, 2013

Friday Q&A: Cat-Cow, Back Extensor Muscles, and Mountain Pose

Following on the heels of one of our recent posts about osteoporosis (OP) came this inquiry about some suggestions for particular asanas:

Q: What about the cat pose in cat/cow sequence? Can you make any possible modification in focusing more on rounding the fanny end of the spine, rather than the shoulders?  Best poses for back extensor strengthening? Anything that reinforces Tadasana?

A: Even though the motivation for asking for these three suggestions may not have been directly related to osteoporosis, Cat/Cow is great as a weight-bearing posture for strengthening the wrist bones.  Poses that strengthen the back torso extensor muscles, which attach all along the spinal column, would strengthen the bones of the spine. And Mountain pose (Tadasana) done with engaged leg muscles is weight-bearing on the feet, so could translate into strengthening of the bones of the legs and hips. That said, let’s now look at the specific issues at hand:

Starting with Cat pose in the dynamic practice of Cat/Cow, we usually encourage the spine to round evenly toward the ceiling, keeping the arms engaged and elbows straight, releasing the crown of the head towards the floor, and tipping the pelvic backwards into retroversion, with the sit bones and tail bones turning down.  If you observe a group of students doing this, you will see some students who seem to have more movement and rounding in the upper back and some who seem to have more in the lower back. There can be many reasons for this, which we won’t go into today, but if you want to emphasize the pelvic tuck and lumbar flexion part of the formula, you might try the following at home:
  1. Find a landing that is just one step off the floor.
  2. Come into hands and knees position, with your knees and shins on the low landing and your hands down on the floor.
  3. Practice Cat/Cow as usual, and see if you don’t have more awareness of the lower back and pelvis. If you are not sure, switch it around with shins on the floor and hands on the landing and see what you feel.
Also, more actively hollowing the lower belly up towards the spine as you exhale into Cat shape can bring more rounding of that “fanny end” of the spine. Finally, doing the pose positioned sideways to a mirror that gives you visual feedback can help you see where you tend to have more movement, and you may be able to play around and bring more movement into the lower half of the spine.

The back extensor muscles, which line the entire back of the head to tailbone region of body, primarily take the spine into back bending actions, but can also contribute to some rotation of the spine, as well as side-bending. If we just consider the back bending actions of these muscles, anything from the obvious Cobra, Locust, Upward-Facing Dog, and Bridge poses and on into the more advanced backbends will strengthen the back extensor muscles nicely. And you can play with both dynamic or static versions of these poses as I have written about previously. And even a pose like Warrior 2, with a slight feeling of backbend and rotation, will work these muscles likely. Also, every time you come up from Standing Forward Bend (Uttanasana) to arms overhead, as you do in Sun Salutations, you are activating your extensors nicely. Use your deductive skills to look at other poses and see if you can imagine the extensors in action as well.  There are lots more in addition to those I have mentioned.

And as for ways of reinforcing the alignment of Mountain pose (Tadasana), I like to do a reclining versions of this pose, on the back, with the feet pressing into the baseboard of a wall, putting even pressure in the balls and heels of the feet. I also recommend standing with the back to a wall, with the heels close to the wall—perhaps just a few inches away—and with the buttocks flesh lightly touching the wall. Depending on the build of your chest, your shouldblades may or may not touch the wall. From this position, lengthen up to the crown of the head.  Also, all of the poses that strengthen your extensors, as discussed above, are helpful for achieving better posture in Mountain pose. I like to do Locust pose (Salabhasana) first dynamically (moving in and out with the breath) and then held for several breaths, and then practice Mountain pose to see if there is a change in posture.

Give all this a try in your next home practice and see how it all feels to you.

—Baxter 

Monday, April 23, 2012

For Tamasic Depression: Moving with Your Breath

by Nina
Light in the Mist by Michele McCartney-Filgate
Last week in my post Tamasic and Rajasic Depression, I mentioned how moving with your breath can be very helpful for people with tamasic depression (or for all of us on those days when we're just feeling blue). We don’t have scientific evidence to prove this, however, many long-time yogis have experienced the enlivening and uplifting sensations of vinyasas and mini vinyasas. And I'm here to testify to that! Some possible reasons why this works are:
  • Moving with you breath engages your mind, providing you with temporary respite from depressing thoughts. Coordinating movements with your breath doesn’t give you time to brood or let your mind wander.
  • Consciously breathing as you move improves your breathing in general, which can reduce lethargy and fatigue.
  • Exercising in general can actually change your mood, possibly by changing your body chemistry.
You can use a vinyasa or mini vinyasa as a way to start a longer practice or as a mini practice on its own. If you’re too depressed to contemplate a challenging practice, try some simple movements. Just starting to move, however modestly, can sometimes get your energy flowing and may even motivate you to move onto a longer practice.

Practicing a vinyasa with a backbending movement may be the most helpful for depression. For most people, backbends are energizing and uplifting. Patricia Walden, who teaches yoga for depression, says that backbends “let in the light.” In Gary Kraftsow’s sequence for chronic depression in Yoga for Wellness, he includes a mini vinyasa with Bridge pose, a sequence that includes Warrior 1, and second mini vinyasa with Upward-Facing Dog pose, probably for the same reasons.

Today I’m just going to offer up a few ideas for poses you can use to start a practice or to do on their own as mini practices (and, hmmm, now that I look at the list, I realize you could actually do them all, in the order below, as a short sequence). Some of these ideas come from Patricia Walden, some from Gary Kraftsow, and some are my own.

Cat Pose: If you can’t even bring yourself to stand up on your yoga mat, whether because you’re depressed, discouraged, or just tired, try starting on hands and knees. Move into your backbend on an inhalation (what some people call Cow pose and what I like to call Purring Cat) and arching your back into Cat pose on an exhalation. Repeat any number of times. Who knows, maybe you’ll feel like going into Doward-Facing Dog pose next or perhaps even standing in Mountain pose on your mat. By the way, you can even do this pose in a chair, as we described in our post Chair Cat Pose, anywhere and in any attire.

Mountain Pose: The easiest standing mini vinyasa is to move in Mountain Pose. Start in Mountain pose, with your arms by your sides. On an inhalation, bring your arms overhead as you bend slightly into a backbend in your upper back. On an exhalation, release back to your starting position, bringing your arms back by your sides. Repeat six times.

Warrior 1: Moving from Warrior 1 stance to full Warrior 1 pose as we illustrated in our post Warrior 1 and Warrior 2 Mini Vinyasas is a more challenging vinyasa. But the fact that it takes more concentration and effort may bring you more powerful results. Repeat six times.

Bridge Pose: This is the deepest backbend of the group, which provides the benefits of a good chest opening along with the benefits of moving with your breath. Start by lying on your back with your knees bend, your feet about hips-width apart and your arms by your sides. On an inhalation, press down with your feet as you lift your pelvis off the ground, open your chest, and raise your arms overhead and down toward the floor behind your head. On an exhalation, return to the starting position, dropping your pelvis straight down to the floor as you bring your arms back by your sides. Repeat six times.

I hope that some of you out there will give these a try and let me know how it goes!

Subscribe to Yoga for Healthy Aging by Email ° Follow Yoga for Healthy Aging on Facebook ° Join this site with Google Friend Connect


Thursday, March 29, 2012

Featured Pose: Upward Bound Hands (Urdva Baddha Hastanana)

Upward Bound Hands pose
by Baxter and Nina

This simple pose allows you to stretch and strengthen your shoulders, arms, hands and wrists, providing the perfect antidote to working with your arms down by your sides all day. Raising your arms overhead with bound hands reverses the effect of gravity on your arms and reestablishes the full range of motion of your collar blades and shoulder blades.

This pose releases muscular tension in your shoulders and upper back from sitting, driving, and/or traveling, and builds strength in your shoulder girdle muscles. It is also helpful for people who tend to develop swelling in forearms or hands, or those who have undergone cancer treatments with removal of lymph nodes.

Version 1, in which your palms are turned up toward the sky, takes your wrists into extension, which is a good is a counter-pose for people who are working with their hands all day, whether typing at a computer or using tools for your job. In addition to releasing the wrists, this version stretches the inner surface of your forearms, which could be beneficial to people with golfer’s elbow (inflammation at the inner elbow).

Version 2, in which your palms are facing the floor, you get a good stretch on the opposite side of your forearm, which could be helpful for people who have tennis elbow. Because the yoga practice typically requires a lot of wrist extension (think Downward-Facing Dog pose, Cat/Cow pose, and Plank pose), Cat Cow, Version 2 of this pose is an effective counter-pose for yoga poses where you bear weight on your hands. 

Because both versions of the pose are beneficial in different ways, we recommend you practice both of them, either on the same day or alternating them. This pose takes up very little space, which is why we’re including it in our office/travel yoga practice. If standing isn’t possible, you can do the arm position from a seated position.

Baxter prescribes this pose for:

•    upper back shoulder and arm stiffness
•    as a counter-pose for kyphosis (Dowager’s hump)
•    elbow conditions, such as tennis or golfer’s elbow
•    carpal tunnel syndrome (or prevention of)
•    arthritis of shoulder, elbow, wrist or finger joints
•    dullness of mind or fatigue, (it is slightly stimulating)
•    weakness in the shoulder girdle area (it strengthens the shoulder and arm muscles)

Instructions:


Version 1:
Start by standing in Mountain pose, with your feet about hips-width apart (or sit on a chair with your feet flat on the floor). Now, interlace your fingers and turn your palms toward your feet. Strengthen your legs, pressing from your hips into your feet. Then, on an inhalation, bring your arms forward and up. Lengthen your spine and lift your collarbones as your lift your shoulder blades. Move your arms toward a vertical position, keeping your head in a neutral position. Once you encounter resistance in your shoulders or upper back, resist the impulse to take your arms further back. Stay in the position for about one minute, possibly working up to two minutes.
To come out of the pose, lower your arms forward and down before releasing the clasp of your hands. Pause for a few minutes and notice the effects of the pose on your whole upper body (hands, wrists, arms, and shoulders).

Version 2:
Start by standing in Mountain pose, with your feet about hips-width apart (or sit on a chair with your feet flat on the floor). Now, interlace your fingers and keep your palms upward. Strengthen your legs, pressing from your hips into your feet. Then, on an inhalation, bring your arms forward and up. Lengthen your spine and lift your collarbones as your lift your shoulder blades. Move your arms toward a vertical position, keeping your head in a neutral position. Once you encounter resistance in your shoulders or upper back, resist the impulse to take your arms further back. Stay in the position for about one minute, possibly working up to two minutes.
To come out of the pose, lower your arms forward and down before releasing the clasp of your hands. Pause for a few minutes and notice the effects of the pose on your whole upper body (hands, wrists, arms, and shoulders).

Cautions: If you have rotator cuff injury, approach this pose cautiously to be sure you don’t aggravate the injury. And even though this pose can be helpful for tennis elbow, golf elbow, and arthritis, please practice cautiously to be sure you don’t aggravate those conditions. Because this pose can potentially raise your blood pressure, if you have a history of high blood pressure, heart conditions, or strokes, move dynamically rather than keeping the arms overhead. Raise your arms up with an inhalation and then down with an exhalation.

Because this pose creates a backbend in the thoracic spine, those with osteoporosis or osteopenia should be cautious and aware as you go into the pose that it does not precipitate pain. Those with thoracic outlet syndrome should either skip this pose or do the dynamic version, moving in and out of the pose with your breath.