How Much Protein You Need and

Pro Bodybuilders eat about one gram (sometimes even 1.5 grams) of protein per pound of body weight or per pound of non-fat tissue. I'm sure you've seen that the recommended dail

Comments

Showing posts with label Baxter Bell. Show all posts

Thursday, September 29, 2016

What is in a Gesture? Nearly a Year with Mudra

by Baxter
Bhramara Mudra by Melina Meza
Late last year, my colleague Mary Northey gave me wonderful book on yogic hand gestures (hasta mudras) written by Joseph and Lilian LePage. As I first flipped through the pages, my curiosity was piqued. This book alone describes 108 hand mudras (there are other categories of mudra we won’t get into here, such as facial gestures, whole body gestures and others), and there are likely many more hand mudras out there. This was actually not my first exposure to the idea of the uses and potentials of specific hand gestures. Some years ago, I had attended a workshop with Richard Miller, PhD, in which we learned the famous Indian chant and prayer the Gayatri mantra, and the extensive series of hand mudras that are sometimes performed while chanting the mantra. And many of my teachers over the years used the most commonly done mudras at end of class or during a final sitting meditation, such as Anjali mudra (prayer position) or Jnana mudra (wisdom mudra). I also remember seeing hand mudras as part of an Indian classical dance performance on my trip to India in 2005, an art they have long been associated with. We even have had an excellent post on our blog by Beth Gibbs on mudra Mudras for Healthy Aging

So, as I started to regularly include mudra into my morning meditation practices in November and December of 2015, I very quickly discovered to my delight that my mind was more focused during meditation than it had been prior to introducing mudras. Regardless of the many other benefits that modern practitioners attribute to mudra, I was more than satisfied with this tangible initial benefit. With that personal discovery, I decided to share a new mudra each week with my local yoga classes as part of the initial meditation we do at the start of each class. We are now 9+ months into it, and my students love it! Many have reported back finding the mudra added to their home meditation and breath practices helpful in calming, energizing, and balancing their minds and bodies.

What I myself have delighted in discovering in my 10 months of mudra exploration is how many of the mudra have potential benefits for physical and mental-emotional wellbeing. There are mudras to address headaches, pain, anxiety, depression, stress, the health of the lungs and heart, and really almost every system of the body. The present challenge with all these “potential” health benefits is that to date we have no scientific studies looking at the outcomes of doing mudra regularly, nor how they might work. However, they are incredibly safe to practice and almost anyone can do the hand gestures, even if they cannot do full asana practice, as another way of experiencing yoga. And Joseph LePage suggests that they can also increase hand strength and finger dexterity as a beneficial side effect. As I observe my own mom’s gradual diminished abilities with hand dexterity, I am hopeful that including them in my practice can be both preventative now, and a form of treatment down the road if needed for my hands!

To recap, my discussion highlights the following upsides to learning and using mudras: they can deepen your concentration and focus in meditation and pranayama, they could potentially have a positive impact a wide variety of health conditions, and they have beneficial effects for your hands. 

One of my favorite mudras is Bhramara mudra, which is named after the bumblebee, and is related to the same word as the breath technique Bhramari (Buzzing Bee) Breath. I like this one because the position of the fingers and hands is just challenging enough to maintain that it works well of keep my focus on the here and now. (And it’s said to be useful for allergies and to help bolster your immune system, which would be great benefits for fall.) 

You can do Bhramara mudra in any seated, reclined, or even standing position, and can combine it with any meditation and pranayama techniques. 

To practice the Bhramara mudra:
  1. With your palm facing up, curl the tip of your index finger to the base of your thumb, where your thumb meets your palm.
  2. Touch your thumb pad to the edge of the last digit of your middle finger.
  3. Extend your 4th and 5th fingers, as shown in the photo.
  4. If you are sitting in a meditation position, place the back of your hands on your legs. Maintain a lifted spine, relax your shoulders, and let your arms be slightly away from sides of your torso.
  5. Because this mudra can be a bit challenging to hold, start by holding the mudra for 2-5 minutes and gradually work up to longer holds of up to 45 minutes. You can repeat up to three times a day (but probably not for more than a total of 45 minutes/day).
  6. When you are done, shake out your hands and wrists, and wiggle your fingers. 
For more information on mudra, see Mudra for Healing and Transformation by Joseph and Lilian Le Page. Other titles I recommend include Mudras of India by Cain Carroll and Revital Carroll, and Mudra, Yoga in Your Hands by Gertrud Hirschi. 

Subscribe to Yoga for Healthy Aging by Email ° Follow Yoga for Healthy Aging on Facebook ° Join this site with Google Friend Connect


Thursday, September 22, 2016

Case Study: Yoga and Gastrointenstinal Distress

by Baxter
Angry Doe by Marie Lossky (@Marie.Lossky on Instagram)
For over 15 years, I have been seeing clients and yoga students regularly in one-on-one sessions to address many different health issues using yoga’s powerful tools. Today, I’d like to share a short case study that looks at the effect of yoga on gastrointestinal symptoms. 

SB is a 50-year old professional women who initially came to see me for yoga recommendations on how to address her long-standing low back pain, with a secondary concern about her stress levels. Interestingly, she did not mention having any difficulties with her digestive system until we had been working together for several years. In my experience, this is not so unusual, as many people are reluctant to discuss issues related to elimination unless directly asked. So, for the first years of our work together, we focused on designing a home practice that could address her lower back and stress levels, which included a mixture of asana, pranayama, and meditation. She typically did her home practice right after work or before a dance class she was able to re-join as her back pain improved. And although her stress levels improved over time, she continued to note that her work was an ongoing stressor. 

When she asked if we could design a short morning practice that she could do before work at home with her partner, who also had a history of chronic low back pain, I said of course, and immediately created one. And this new addition to her home practice came with an unexpected beneficial side effect! She returned a few weeks after starting her new morning practice to report that to her amazement some annoying gastrointestinal (GI) symptoms had disappeared after a few days of her morning yoga practice. She reported that for years she would have a bout of explosive diarrhea each morning shortly after arriving at work. The addition of her morning yoga had completely resolved this daily inconvenience. In my opinion, it is likely that her GI symptoms were stress-related, and that the morning yoga was addressing that by reducing her stress levels. As she herself said:  

“As an added benefit, [after starting my morning practice] I also immediately reduced morning GI issues related to stress. This wasn’t something I imagined would occur, but it was a welcome secondary benefit. I believe doing the home practice in the morning before work helped regulate my nervous system as well as help stretch and strengthen my body.” 

Although persistent GI symptoms warrant a visit to your doctor to rule out more serious underlying conditions, a good starting place for new, milder symptoms that could be directly related to stress is trying yoga’s stress management tools. For specific recommendations, check out Using Stress Management Techniques for Medical Conditions and  How Yoga Helps Your Digestive System.

Subscribe to Yoga for Healthy Aging by Email ° Follow Yoga for Healthy Aging on Facebook ° Join this site with Google Friend Connect

Friday, August 12, 2016

How Yoga Helps Medical Conditions: Adjunct to Western Medicine

by Baxter
People Join Together to Form Another Person
by Utagawa Kuniyoshi

In our posts How Yoga Helps with Medical Conditions: Prevention and How Yoga Helps Medical Conditions: Symptom Improvement, we described yoga’s powerful role in preventing medical conditions, and for improving symptoms and sometimes even curing conditions. Today, we will look at an equally valuable application of yoga: as an adjunct to western healing modalities. 

For yoga, acting as adjunct treatment means playing a secondary role by supporting or enhancing the effects of the primary forms of treatment. Baxter personally experienced this when he was being treated for a frozen shoulder. His western medical treatment included a steroid injection and physical therapy, and Baxter supplemented that treatment by practicing asanas to improve flexibility and using breath work for pain management.

There are four basic ways you can use yoga as an adjunct to western medical treatment.

1. Adjunct for Prevention. When you are using western medical recommendations to prevent a medical condition, you can use yoga to support your efforts. For example, if you have a family history of diabetes and want to do everything you can to prevent yourself from developing the disease, you could use yoga stress management techniques and active asana practices to support the primary prevention recommendations your doctor provided, such as making dietary changes, maintaining a healthy weight, and maintaining adequate levels of exercise. Other examples include using yoga as an adjunct for prevention of heart disease, high blood pressure, and obesity.

2. Adjunct for Ongoing Treatment. When you are receiving ongoing medical treatment for a condition or disease, such as multiple sclerosis, chronic back pain, or high blood pressure, you can use yoga to improve symptoms, such as pain or weakness, to prevent your condition from worsening, or to help you maintain your present level of functioning. You can also use yoga’s stress management techniques to help you deal with stress of having an ongoing medical problem.  

3. Adjunct for Rehabilitation. When you are undergoing rehabilitation from physical problems, including an injury, recent surgery, cancer treatment, stroke or heart attack, you can use yoga as an adjunct to the primary treatments, such as medication or physical therapy, which you are receiving to help you heal. For example, after cancer treatment you could use your asana practice to regain strength and stress management tools to help you recover emotionally. And for emotional problems, such as anxiety and depression, you could supplement medication and talk therapy with yoga stress management and equanimity practices.  

4. Adjunct for Palliative Care. When you have a condition for which there is no cure, you can use yoga for symptom relief and comfort care as a supplement to medications and other primary treatments. For example, for someone with COPD (emphysema), who will not regain normal breathing even with western medications, yoga tools such as meditation and simple breath practices can help ease anxiety and stabilize symptoms, at least for a while. For end of life care, yoga can compliment hospice care, helping to ease the transition towards death.  

Subscribe to Yoga for Healthy Aging by Email ° Follow Yoga for Healthy Aging on Facebook ° Join this site with Google Friend Connect

Tuesday, August 9, 2016

TKV Desikachar: An Appreciation

by Baxter 
When I first checked my email on Monday morning, in my inbox I found a short message from a yoga colleague, “Just heard that your guru Desikachar passed away early this morning-India time.” I had been aware that TKV Desikachar, son of T. Krishnamacharya, had been in poor and declining health for the last several years, so I was not taken by surprise by the news, but was struck by both a sadness for the loss and a deep gratitude for the teachings he shared with the global community about his father’s yoga traditions and his own insights. 

My first encounter in 2001 with Mr. Desikachar almost didn’t happen, due to the events of 9/11. He was scheduled to teach at the Yoga Journal Conference in Estes Park that was set to start the following week, and it was quite uncertain if flights from overseas would be back on schedule in time for him to come. But he did, and for several afternoons, for two-hours stretches, I was introduced to not only the teachings of Yoga, but to a man who exemplified the qualities of a compassionate human being and powerful teacher. He was an amazing listener when asked questions, often answering with a spot-on real life story to bring the concepts and practical uses of yoga home to us. Sprinkled in with these talks were kindness, humor, and playfulness amidst heady ideas like avidya and the other kleshas. And the yoga asana he shared was simple, accessible, and effective in quieting the mind, enlivening the body, and cultivating a sense of health and contentment that was unique for me at that point in my yoga exposure. At one point in listening to him quietly, respectfully, and insightfully answer a person’s question about yoga, I was quite literally moved to tears by the beauty of the exchange. 

Up to that point in time I had never wanted to travel to India, but after those short few days, I realized I now wanted to go to India, not for the culture or the history of the country, but to study with this teacher. So, a few short years later, in February of 2005, I did just that, traveling to study for one month at the Krishnamacharya Yoga Mandiram in city of Chennai, in the southern state of Tamal Nadu, in the country of India. And although we students from all over the world did not get as much time with Desikachar as we all wanted, those Saturday morning sessions with him were powerful experiences. For there I was shown the potential of other aspects of yoga that I had not been exposed to before, in particular the use of sound and chant to achieve the goals of yoga. It was also evident from the quality of his teaching staff, with whom I spent most of my time during my stay, that his teaching were making their way to us even when he was not the direct messenger. And despite the fact that the asana portion of the practices we did twice each day were not physically demanding when compared to my home sessions in the Iyengar style, I was delighted to notice how well I felt each day, and how healthy I remained despite the stresses of living and eating in a land so different from my home. 

That experience with the yoga taught by Desikachar changed the way I practice and teach the myriad tools of yoga to this day, for example by bringing the mini vinyasa, unique pranayama approaches, sound practices, and studying of the Sutras into my Iyengar-influenced approach to yoga. For that I will be eternally grateful. 

I got to be in his presence one final time, a few years back when his health still permitted him to travel to San Francisco, for a workshop on the breath. On top of the thrill of studying one more time with Mr. Desikachar, I was so delighted to see many of his US-based students who had travelled there to see him also—teachers who have carried his teaching far and wide, including Richard Miller and Larry Payne. We all still had more to learn from this master of yoga. I will miss him and am grateful for his gifts, always. 

Subscribe to Yoga for Healthy Aging by Email ° Follow Yoga for Healthy Aging on Facebook ° Join this site with Google Friend Connect

Thursday, July 21, 2016

Frozen Shoulder, Part 2

by Baxter
Anatomical Studies of the Shoulder by Leonardo da Vinci
For those of you out there who might have missed Nina’s original post on frozen shoulder from a while back (see Yoga and Menopause: Frozen Shoulder), I’d highly recommend it. And while Nina rightly points out a correlation between menopause and adhesive capsulitis (that’s its fancy name), it turns out that men fall victim to this conditions as well. In fact, I developed a case of it in my left shoulder over the fall and early winter months of 2015-16!

Some interesting statistics on and features of frozen shoulder: 
  • It usually affects those over 40 years of age, with the peak period being between 40-70 year of age. 
  • 70% of cases are women and 30 percent are men. 
  • The jury is still out on what causes frozen shoulder. Although there is a connection between menopausal changes in women and the development of frozen shoulder, the other leading contenders are that it is an inflammation problem, an autoimmune problem, or simply a stiffening of the joint capsule problem (a process called fibrosis). 
  • Since it does not always show up in isolation, it can be accompanied by other causes of shoulder pain, such as bursitis or rotator cuff injuries, making diagnosis and treatment tricky. 
  • According to the Mayo Clinic, you are at higher risk of getting it if you have diabetes, heart disease, Parkinson’s disease, thyroid conditions, or a recent trauma that immobilizes your arm such a fracture or stroke.
When I started getting pain and limited range of motion in my left shoulder and arm last fall, I was not sure what was going on. It came on gradually and I did not have any of the risk factors I had read about, but I had tweaked my shoulder 15 years ago while climbing and had some chronic stiffness that my yoga usually worked out nicely. And then there were two events in September. First, I was swinging on a low trapeze bar for about two minutes, after which I noticed that my shoulder was not so happy with me. And, second, two weeks later I took a trip to an indoor sky-diving place, where a total of four minutes in the wind tunnel with the arms in bird-wing position made my shoulder even more unhappy. I recently came across research that connects direct or indirect trauma to the shoulder joint as a common cause of secondary frozen shoulder, which could explain my case.

When I finally got into to see the orthopedic specialist in late January of this year, initially I was offered a couple of steroid injections to cover both rotator cuff injury and frozen shoulder. At that point I asked for an MRI, since my physical exam could not confirm either diagnosis (it’s good to keep in mind that history and exam don’t always tell you what is going on for sure). And the MRI showed a healthy rotator cuff and definite frozen shoulder, so I only really needed one injection! That very same day, I got into to see an amazing physical therapist, who gave me a set of exercises to begin immediately. From a Yoga for Healthy Aging perspective, I was delighted to discover that some of the exercises were dynamic movements (similar to Arms Overhead Pose), done in sets of 10 repetitions, and others were static movements, held between 2-5 minutes. When I asked about the longer holds, my physical therapist mentioned that the joint capsule, made up of thick connective tissue, requires longer holds to loosen, similar to the timing we’ve discussed for stretching fascia here on the blog.

Now, I had read the studies that the average time for recovery of range of motion was 1-2 years and that really did not fit into my plans, so I asked the physical therapist if he had ever had a patient who recovered faster. He said, yes, one person who had actually taken his advice to do the physical therapist exercises hourly during the day had seen a rapid recovery in just a few weeks! (He pointed out that most patients only do them infrequently.) That was all the incentive I needed, and I started my practice immediately that day. After all, abhyasa (yogic practice) is not all that different (see Practice)!

One of the challenges of rehabbing frozen shoulder is that you actually have to move into far enough into stretch that it is painful. This is in contrast to physical therapy for rotator cuff injuries, where you would not go to the point of pain. I found that my ability to focus on my breath while holding painful stretches for 2-5 minutes was invaluable in staying the course without over triggering my sympathetic nervous system. And although I did not do them every hour, I often got 3-4 sessions in every day for the next few months. By April, my pain-free range of motion in that left shoulder was back to normal, and my physical therapist bid me farewell, with the important reminder to keep an eye on my right shoulder, as 25% of those with frozen shoulder will get a case of it showing up in the opposite shoulder in the 2 years that follow (Nina had this happen).

My takeaways:
  1. If stiffness and pain persist in your shoulder, get it checked out by a specialist to get a solid diagnosis.
  2. Try to see the best physical therapist you can in your community—it can make a difference.
  3. Apply your yogic practice skills and your yoga tools to your rehab. (I was doing all the yoga poses I could do, although with left arm modified, along with my physical therapy exercises, and I believe it helped!).
Subscribe to Yoga for Healthy Aging by Email ° Follow Yoga for Healthy Aging on Facebook ° Join this site with Google Friend Connect

Thursday, June 2, 2016

Staying Upright: About Our Postural Reflexes, Balance, and Yoga

by Baxter
Playing at Giants by Francisco Goya
In the course of researching agility and balance, I came upon the mention of “postural reflexes.” We humans have a lot of reflexes, so I was not exactly sure what these reflexes were. But I began to do some digging. 

It turns out that you have a couple of reflexes that automatically correct the orientation of your body when it shifts from being up upright. They kick into action when unexpected events throw you off balance so your body can prevent you from falling by quickly attempting to self-correct. Imagine turning and suddenly almost (or actually) bumping into someone, walking down a slick ramp and suddenly slipping a bit, or reaching that darn crack in the side walk that trips you up. They also kick into action during everyday balancing activities, such as when you are standing on a chair in the kitchen trying to reach into the upper shelf or when you are walking on the raised edge of a curb just for the fun of it. 

Our postural reflexes start to develop when we are infants starting to sit up, advance when we are toddlers learning to walk, and continue to be refined through adolescence into young adulthood. In the early days staying upright requires a lot of conscious effort, but with time and practice, our coordinated, muscular responses to being off balance or anticipating loss of balance become more subconscious and reflexive.

These postural responses that keep you upright (or try to!) are a result of information sent to your brain from your inner ears and eyes, the pressure sensors on your feet, and your proprioceptors (the nerves that tell you where you are space). As we age, our postural reflexes may slow down due to age-related changes in one or more of the components of this complex system.

However, in studies of older stroke victims who initially show a decrease in postural reflexes after their stroke there is evidence that practicing agility exercises helps them regain some of their lost function. So although there have been no specific studies of on yoga and postural reflexes, it’s likely that practicing a variety of yoga poses to improve strength, flexibility, balance, and agility would help you maintain and/or improve your postural reflexes. For maintaining postural reflexes, I would particularly recommend strength building practices, as well as balance and agility practices, both static and dynamic variations. 

Subscribe to Yoga for Healthy Aging by Email ° Follow Yoga for Healthy Aging on Facebook ° Join this site with Google Friend Connect

Thursday, May 19, 2016

How We Age

by Baxter and Nina

"And you may find yourself
Behind the wheel of a large automobile
And you may find yourself in a beautiful house
With a beautiful wife
And you may ask yourself, well
How did I get here?" — from “Once in a Lifetime” by the Talking Heads

All living things age, and every species has a natural, built-in life span. Although a giant tortoise and koi carp can live up to 200 years, the average life span of a human being is around 79 years, a cat lives to around 20, a dog to around 10, a mouse to around 2 years, a worm to only 10-30 days, and the legendary mayfly only a single day. But, no matter how brief, all these living things go through a natural aging process during their life spans (yes, even worms get all wrinkly in their old age), similar to the ones that we ourselves go through.
Life Span of a Worm by Arvind Ramanathan
So what exactly is this natural aging process? Many of us have been able to observe the entire arc of the process as we raised our family dogs. Do you remember something about how it went for Fido?

At the age of two, Fido was a young, healthy adult, with tons of energy, good eyesight, keen senses of smell and hearing, and a shiny coat. He was able to learn and remember quite a few commands, like “sit,” “down,” “fetch,” and “off.” His mind was alert and attentive to you and his environment, and there was an obvious delight in new discoveries and exploration. 

But by the age of five, Fido was already entering middle age, and his energy and vitality were probably noticeably slower. Although he still loved to go on those long hikes with you, you may have noticed that he was bounding less and just focused on maintaining a steady pace. And when he jumped up onto the couch or bed, he wasn’t quite as spry. There were other changes, too, like maybe his digestion wasn’t what it once was or he started having trouble with bladder control. And with his immune system beginning to age, maybe your once super healthy dog started experiencing more illness or infections.

By the age of eight to ten—depending on his size—Fido had become an old dog with a gray muzzle, heading into his final years. His energy and vitality were reduced even more, and though he still loved to go out and sniff things, those long hikes were a thing of the past. And he walked more slowly and stiffly, too, as his strength, flexibility, balance, and agility began to wane, and perhaps arthritis set in. His respiratory functioning diminished, so when he was very active, he became short of breath. And his keen hearing and eyesight also began to worsen (dogs even get cataracts, as do we). 

You might have needed to take Fido to the vet more often at this stage, as he developed more frequent infections or chronic illness, or any number of age-related conditions, such as heart problems, diabetes, digestive issues, obesity, or cancer. Perhaps even Fido’s mind wasn’t what it once was. He may have developed symptoms of cognitive dysfunction, such as confusion or disorientation, restlessness at night, loss of house training, decreased attentiveness, or not recognizing friends or family members.

Eventually the really sad part came, when you had to say goodbye. Fido died while you were still young, probably of a fatal illness, such as cancer, an overwhelming infection, or just heart failure due to old age. Yes, we know, it was a bit difficult to witness, wasn’t it? After Nina’s family dog died, her mother said there would be no more family dogs because the thought of going through that whole thing again was just too painful. But remembering it now will help you understand quite a lot about how humans age, something we’ve been getting into a lot lately on the blog (Your Immune System and Aging, Balance and Aging, Flexibility and Aging, and Aging Changes to Your Brain and Nervous System, among others).

As for why this happens, well, that’s a whole different story. See What is Aging, Anyway?

Subscribe to Yoga for Healthy Aging by Email ° Follow Yoga for Healthy Aging on Facebook ° Join this site with Google Friend Connect

Wednesday, May 18, 2016

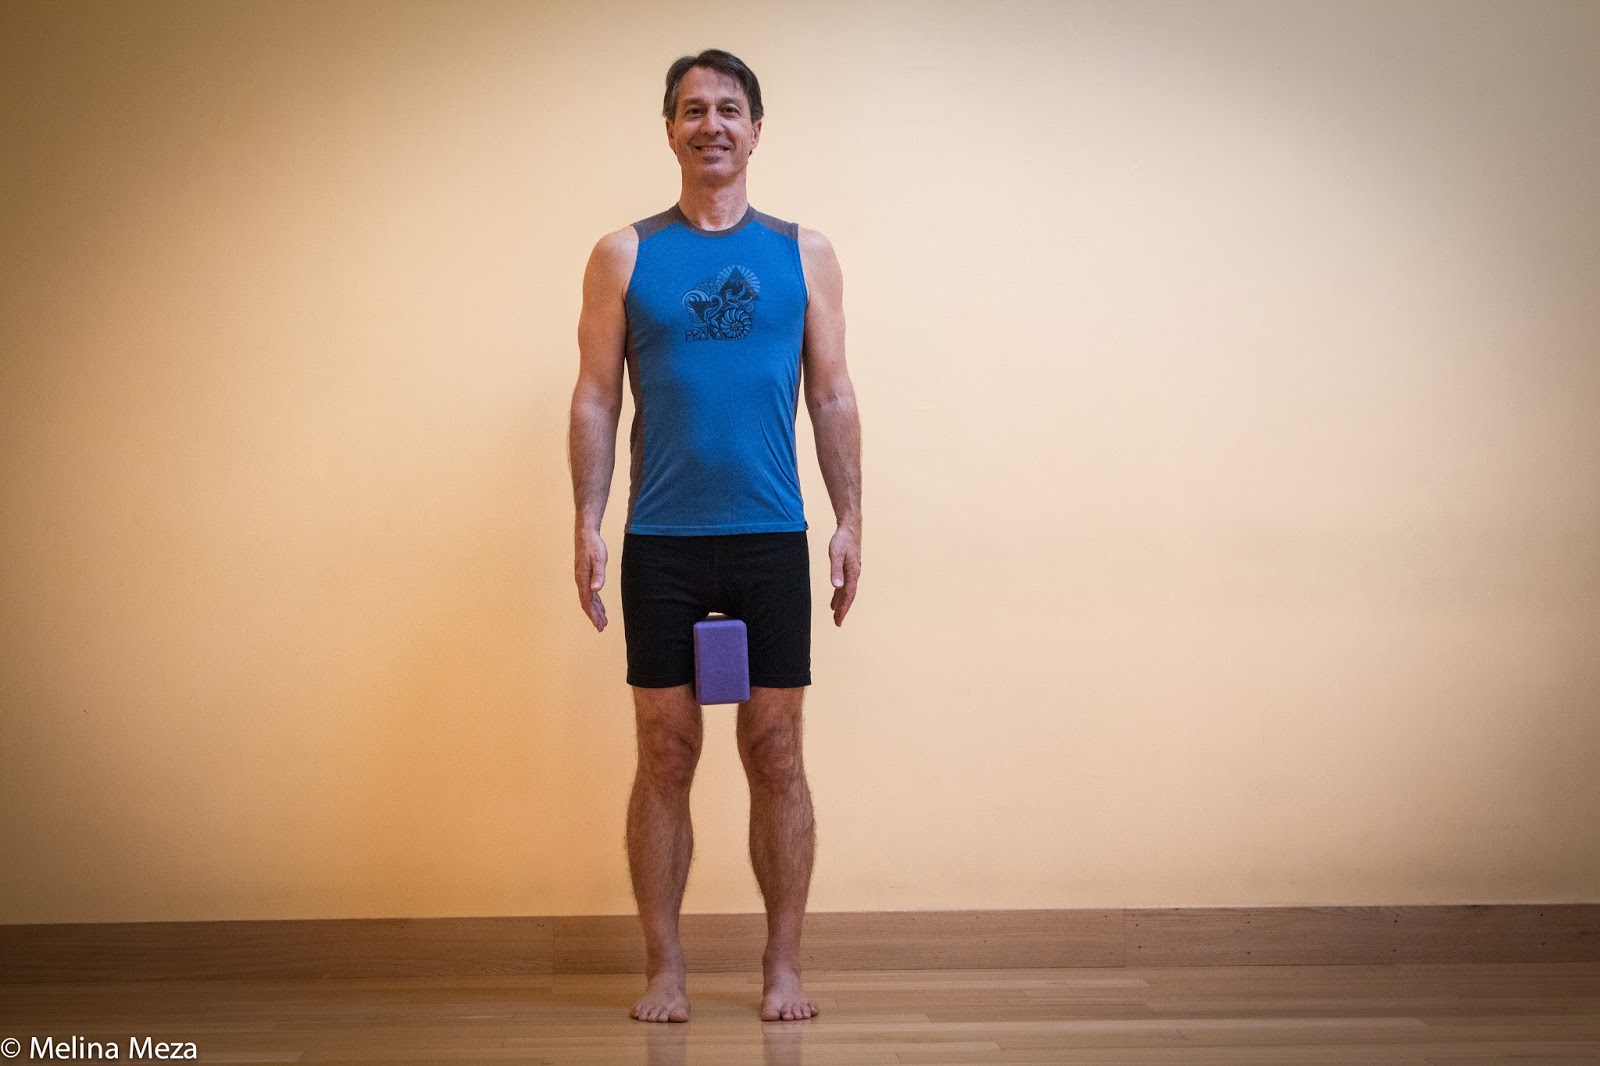
Featured Pose: Mountain Pose (Tadasana)

by Baxter
Many yoga traditions consider Mountain pose to be the original standing pose, from which all the other standing poses emerge. So mastering this pose helps you perform all the other poses. This pose is also an ideal, active standing position that supports healthy overall posture, teaching you healthy alignment of your pelvis and spine over your feet, and your head over your torso. It also cultivates strong legs, an even balance between your feet, and an even opening in your chest and your upper back.

Baxter prescribes this for:
  • Improving posture 
  • Low back pain
  • Improving balance 
  • Text neck or head forward syndrome
  • Weakness in the legs or spine
  • Resting between standing poses
  • Standing meditation pose
Timing: If you are an experienced practitioner, hold the pose for 1-2 minutes. If you are new to the practice, start by holding this pose for 30 seconds at a time, working up to 1-2 minutes over time.

Cautions: This pose is generally very safe and accessible. If you have trouble with balance, step your feet wider apart and/or practice with your back near a wall. 

1. Classic Version
Stand with your feet hips-distance apart and parallel to each other. Distribute your weight evenly on your feet and actively firm your upper thigh muscles evenly toward your thighbones. From your tailbone, lengthen upward through your spine to the crown of your head, as if you were growing taller. Without squeezing your shoulder blades together, widen the front of your chest so your chest and your upper back are both broadening. Position your head directly over your shoulders, with your chin parallel to the floor. Either relax your arms at your sides or actively reach down from your shoulders into your fingers, with your palms facing your thighs. 

As you maintain these internal actions, gently lengthen your inhalations and exhalations, while remaining active and alert. To come out of the pose, simply relax the physical effort of Mountain pose and notice the posture your body returns to. If desired, repeat the pose one more time.

2. Block between Thighs
This variation strengthens and brings awareness to your legs, especially your inner thigh muscles, which are often weaker than your other leg muscles. 

Start by taking the classic version of Mountain pose. Next, place a block on its narrowest width between your thighs, half way between your pelvis and inner knees. Step your feet a bit closer together. Then firm your legs into the block while lengthening down into your feet. If you tend flatten your lower back, roll your thighs in and push the block back slightly to encourage a normal lumbar curve. If you have a sway back that is painful, squeeze the block and draw your tailbone down slightly towards the block. 

Follow the leg, spine, chest, and head instructions for the classic version, and use the same breathing technique. To come out of the pose, remove the block and relax your physical effort, especially your legs. 

3. Reverse Prayer Position
This version opens your front chest, opens your shoulder joints for taking your arms behind your back, strengthens the muscles between your shoulder blades, and stretches your forearms and wrists.

Start by taking the classic version of Mountain pose. Bring your palms together into Prayer position (Namaste) in front of your chest and firmly press your palms together. Next, keeping your elbows bent, bring your hands together behind your back, with your fingertips pointing down. Move your hands a few inches out away from your lower back, and spin your fingertips up toward the your head. With the sides of your hands lightly touching your lower back, wriggle your hands up the line of your spine as high as you can comfortably go or until your palms come completely together. If your palms come together, bring your thumbs together as well. 

Follow the leg, spine, chest, and head instructions for the classic version, and use the same breathing technique. 

Hold your arm position for approximately 30 seconds, gradually working up to 1-2 minutes over time. To come out of the pose, carefully wiggle your hands down your back at least six inches and then release your hands down by your sides. Shake out your hands and arms before moving on.

4. Elbows Clasped Behind Back

 Like version 3, this version opens your front chest, opens your shoulder joints for taking your arms behind your back, and strengthens the muscles between your shoulder blades, but this version more accessible for most people.

Enter the pose like version 3, but instead of bringing your palms together behind your back, bring your just your right arm behind your back. Then bring your left arm back and, depending on your flexibility, clasp opposite elbows or forearms. Follow the leg, spine, chest, and head instructions for the classic version, and use the same breathing technique. 

Hold the arm position for 30-60 seconds and then release your arms. Repeat the arm position on the left side by taking your left arm back first. After finishing both sides, shake out your arms before moving on. 

Subscribe to Yoga for Healthy Aging by Email ° Follow Yoga for Healthy Aging on Facebook ° Join this site with Google Friend Connect


Thursday, May 12, 2016

Customizing Your Practice

by Baxter
Dancers Practicing At The Barre by Edgar Degas
It is easy for us all to go to a class and be lead through a wonderful, balanced practice, but it’s quite a challenge for most people to come up with a similar practice on their own. However, one of the important advantages of practicing at home is being able to customize your practice for your particular needs and desires on a given day. But if designing a yoga practice from scratch is too overwhelming to consider, a good way first step is to tinker a bit with a practice that you found on our blog, elsewhere online, or in a book. It’s simpler than you might imagine!

In this post we’ll make some basic recommendations for how you can customize any practice to make it:
  • More gentle
  • More vigorous
  • Shorter or longer
  • Adapted to your particular limitations

Making a Practice More Gentle

You can make any practice more gentle by:
  1. For dynamic poses, do fewer repetitions, for example, do 3 rounds of dynamic Warrior 2 instead of 6.
  2. For static poses, use shorter holds, for example, hold Warrior 3 pose for 3 instead of 6.
  3. For restorative poses, extend your time in the poses.
  4. Leave out the most vigorous pose or poses from the sequence, either just skipping them or replacing them with gentle or restorative poses. 
  5. Between active poses, rest in Savanana or another resting pose.

Making a Practice More Vigorous

You can take any practice, other than a restorative practices and make it more vigorous in the following simple ways: 
  1. For dynamic poses, add more repetitions, for example, do 10 rounds of dynamic Warrior 2 instead of 6.
  2. For static poses, extend your holds, for example, hold Warrior 3 pose for 10 or 12 breaths instead of 6. And instead of doing poses only once, you can repeat them a second of third time.
  3. Repeat a series of static pose an extra time.
  4. Add in any poses you feel are more vigorous for you, placing them after the warm-up poses and before the cooling down poses.

Making a Practice Shorter or Longer

We all feel the time crunch now and then, and, conversely, sometimes find that we have extra time on a given day. You can easily adjust the length of your practice depending on how much time you have to devote to it on any given day. 

To shorten a practice:
  1. For dynamic poses, do fewer repetitions. 
  2. For static poses, use shorter holds.
  3. Eliminate any poses from the sequence that are less appealing today. Just be sure to keep in at least some of the initial warm-up poses and at least one cool-down pose. 
To lengthen a practice:
  1. Lengthen your time in some of the poses, either increasing repetitions of dynamic poses or extending your holds in static or restorative poses. 
  2. Repeat your favorite pose or poses a few times.
  3. Add in more poses of the same type. For example, in a backbend sequence, add in more backbends, or in a strength building sequence, add in more strength building poses.
  4. Add in a short meditation or breath practice that is not in the sequence.
  5. Rest in Savanana or another resting pose between poses.
  6. Take an extra long time in Savasana.

Adapting a Practice to Your Limitations

Injury. You can still practice with an injury by adapting the individual poses to your limitations. For example, with shoulder injury, you can keep your arms down at your sides in many standing poses or practice the wall version of Downward-Facing Dog pose instead of the full version. For those poses you cannot adapt, you can simply skip them, for example, skip Plank pose with a shoulder injury. When you’re in the acute and recovery phrases of an injury, floor sequences and chair variations are good substitutions. 

Illness. When you are ill or recovering from an illness, focus on gentle, restorative practices until you recover. When you’re ready for a gentle practice, use our recommendations above to make your first active practice days easier.

Disability. If you’re working with a longer-term disability, adapt your practice as we described for an injury. Because you'll be practicing this way for a long period of time, it may also be worth getting special guidance from a skilled teacher for creative ways you can adapt various poses to your condition.

Have fun practicing! And don't be afraid to get creative.

Subscribe to Yoga for Healthy Aging by Email ° Follow Yoga for Healthy Aging on Facebook ° Join this site with Google Friend Connect

Wednesday, April 20, 2016

Aging Changes to the Brain and Nervous System

by Baxter
Book, Pipe and Glasses by Juan Gris
We have recently shared some basic information about what the brain and nervous system are and what they do (see Your Brain is More than that Thing in Your Skull). And we’ve also shared with you how yoga can help with healthy aging of these essential parts of our bodies (see How to Foster Brain Health with Yoga). Yet we have not been clear on what the normal aging changes are for the brain and the nervous system, so today, I will address that deficiency!

The Brain and Central Nervous System

As your brain ages, certain areas shrink in size, and as a result, the empty spaces deep in the brain, called the ventricles, expand a bit. As the volume of the brain gets smaller, the neurons—the specialized cells in the brain—also shrink, as do the number of neuron-to-neuron connections, called synapses. On top of this, some of the neurons die and are not replaced by new ones. 

As nerve cells break down, waste products can collect in the brain tissue, leading to new and unwanted growths called plaques and tangles. Growing both inside and outside of the brain, these growths can disrupt the communication network between the neurons. All of these changes can cause your brain to slow down and work less efficiently. You can mitigate some of these changes through practices that foster brain health, including exercise, sleeping well, and continued learning.

Inflammation. As we age, we tend to produce more free radicals, which can lead to inflammation in the brain as well as the body (see Chronic Inflammation and Yoga: An Update for information about aging and inflammation). Inflammation in the brain can increase rates of cell death, and unchecked, can lead to more severe brain issues, such as Alzheimer’s and Parkinson’s. Although we don’t know for sure that you can prevent Alzheimer’s and Parkinson’s this way, you can prevent inflammation in general by focusing on stress management, meditation, and gentle exercise.

Blood Supply. The gradual decrease in blood flow to the brain due to arteries shrinking and changes in the blood brain barrier may decrease your body’s ability to transport nutrition into the brain and keep toxins out. All of this may contribute to overall decrease in brain function over time. To maximize your vascular health, focus on exercise, such as a well-rounded asana practice or even a gentle asana practice as well on meditation, which have have been shown to reverse clogged arteries.

Cognitive Abilities. As a result of all these structural changes, the brain and central nervous system’s ability to function also changes. For example, structural changes to the prefrontal cortex and the hippocampus may cause decreases in learning, memory, planning, and decision making, as well as altering personality. This leads to a decrease in general mental abilities, such as troubles learning new things, recalling information efficiently, and keeping up with technological advances. 

Although all this often leads to older people performing poorly on complex tasks of attention, learning, and memory, all is not lost. It turns out that if older adults practice these tasks, they often perform as well as younger adults. Additionally, older people often continue to improve in certain other cognitive tasks including vocabulary, verbal knowledge, and information analysis. This explains why my grandmother could whoop me at Scrabble when she was 88! And we also know that when we are engaged in learning new activities, skills, and creative projects, the brain will continue to grow and build new neurons and neural synapses, a process neuroplasticity. In addition to continued learning, regular exercise, managing stress levels, and participating in a community will all help foster cognitive ability as you age. 

The Peripheral Nervous System

Aging brings natural changes to the nerves of your peripheral nervous system causing them to shrink and the insulation around them to be reduced. As a result, nerve cells may pass messages more slowly between the body and the brain, causing your body to respond less rapidly and reducing your overall agility. This slowing can also affect your senses, leading to reduced or even lost sensory feedback from your body to your brain, including:

  • Diminished response to touch, and to sense where you are in space and what types of surfaces your body is touching (this affects your ability to balance) 
  • Decreased eyesight
  • Decreased hearing
  • Decreased sense of smell
  • Decreased sense of taste
  • Changes in perception changes, so in some people there is a decrease in pain sensation and sensitivity, while in some others, there is an increase.
By improving blood flow to the special sensory nerve receptors (the nerves that shuttle information back to the brain) and increasing space around your nerves, regular exercise can help support healthy senses. In addition, maintaining good nutrition and regularly resting your senses regularly with restorative practices can also help. 

Slower responses from your nerves to the muscles involved in conscious action affect coordination and speed of movement, as well as strength of muscle response. Of course, this can in turn lead to movement and safety problems. You can counteract this slowing with regular well-rounded exercise, such as a well-rounded asana practice that focuses on strength, flexibility, balance, and agility.

Aging also causes a decline in blood flow in the nerves and the ability of nerves to regenerate after an injury. Regular exercise, such as a well-rounded asana practice, will help with this by improving blood flow and releasing holding patterns around your nerves, allowing them to function them better.

In your autonomic nervous system, the slower messaging of nerves affects how well your brain communicates with your cardiovascular system, as well as the other organs and systems whose functions it coordinates, such as the digestive system and bladder. Slower communication can lead to less efficient functioning of all those systems, causing, for example, sluggish digestion or trouble with urination. To preserve good autonomic functioning, both regular exercise, including a well-rounded asana practice, and managing chronic stress can be helpful. 

To summarize, there’s quite a lot you can do to maintain the health of your brain and nervous system as you age, including:
  1. Exercise regularly. Exercise been shown to be one of most important things you can do for keeping your brain and nervous system healthy as well as your body. 
  2. Maintain good nutrition. Good nutrition is as important for brain health as it is for physical health.
  3. Meditate. This not only improves mental functioning, such as the ability to focus and maintain willpower, but it has been shown that meditation actually strengthen the brain.
  4. Sleep. Good sleep is necessary for the brain to function properly and also to keep it healthy. 
  5. Manage Chronic Stress. Reducing chronic stress helps reduce inflammation and reduces the likelihood of developing chronic conditions that negatively impact the nervous system, such as Diabetes and Hypertension. Allows healing time for nervous system as well as brain.
  6. Keep Learning. Ongoing learning stimulates neuroplasticity and the growth of new brain cells. 
  7. Join a Community. Socializing and belonging to a community improves cognition as well as emotional health.
Subscribe to Yoga for Healthy Aging by Email ° Follow Yoga for Healthy Aging on Facebook ° Join this site with Google Friend Connect