


by Baxter
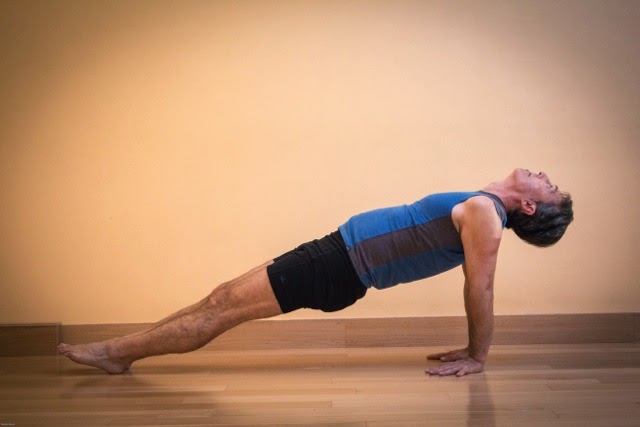 This pose is unique in a couple of ways. First, it lengthens the front of your body, (referred to as the “east” side in yoga, since it would face the rising sun if you were doing Sun Salutations) from the toes to the head. It does that by lifting your front body away from the floor into a gradual backbend shape and so also strengthens your back body in a different way than other back bends, such as Camel pose (Ustrasana), which is much more passive in the use of the back muscles to create the pose shape then Upward Plank is). And second, it is one of the few poses that takes your arms into deep extension, a movement that is useful as preparation for Shoulderstand, another pose that requires similar action at the shoulder joint.
Nina recommends this pose for arm and upper body strengthening, and finds it is a good counter-pose for twists and seated forward bends as it is a mild backbend shape that helps restore the natural curves of your spine.
Baxter prescribes this pose for:
Note that although these days this pose is commonly Upward Plank pose, the name "Purvottanasana" translates as Intense Stretch of the East, referring to the wonderful overall front-body stretch that the pose provides.
Due to the deep extension at the shoulder joint, those with shoulder joint pain or tendonitis or tendency to dislocate in this direction should use caution and stick to the sitting prep position shown below.
As with any pose that drops your head back into a backbend (extension) with the additional pull of gravity at work, those of you with neck issues, especially degenerative discs and facet joint arthritis, should consider keeping your chin tucked to your chest when doing the pose.
Classic Version


First Variation: Prep Pose
This version is for those with wrist, shoulder and neck issues, as it allows you to take the basic shape of the pose without causing strain to areas that need protection.

 This variation is for those who may want to work on increasing shoulder flexibility (arm extension), as it requires more than the classic pose. It also is less of a back bend, so those of you who have difficulty doing backbends may find it a good starting position as you head towards the classic pose.
Third Variation: Chair Upward Plank Pose


The chair version of Upward Plank provides a gentler front body opening, and is easier all around because it does not require as much upper body strength or shoulder flexibility (arm extension). Because your feet will likely be flat on the floor when you come up into the pose, your legs will do more of the work than the other variations and there will be less weight on your hands and wrists. This is a very good starting pose to try if your shoulders are tight.
Nina recommends this pose for arm and upper body strengthening, and finds it is a good counter-pose for twists and seated forward bends as it is a mild backbend shape that helps restore the natural curves of your spine.
Baxter prescribes this pose for:
- general inactivity
- prolonged sitting
- head forward syndrome
- upper body weakness
- tight shoulders
Note that although these days this pose is commonly Upward Plank pose, the name "Purvottanasana" translates as Intense Stretch of the East, referring to the wonderful overall front-body stretch that the pose provides.
Due to the deep extension at the shoulder joint, those with shoulder joint pain or tendonitis or tendency to dislocate in this direction should use caution and stick to the sitting prep position shown below.
As with any pose that drops your head back into a backbend (extension) with the additional pull of gravity at work, those of you with neck issues, especially degenerative discs and facet joint arthritis, should consider keeping your chin tucked to your chest when doing the pose.
Classic Version
- Sit in Staff Pose (Dandasana), with your legs straight out in front of you’re your spine erect over your hips, and your hands on the floor at your sides.
- Move your hands about 6-12 inches back behind your hips, with your palms flat on floor. You can have the hands pointing forward (classic position) or turned out to sides or back if that is better for your wrists.
- Firm your palms down, lengthen through your elbows, and then lift your sternum forward and up to bring your chest into a bit of backbend, while keep your chin and head in neutral position (see Prep Pose photo below).
- Push down through your arms and pivot on your heels as you lift your hips up and forward, pressing the balls of your feet forward and down toward the floor (don’t worry if the balls of your feet does not make it all the way down). Keep your chin tucked to your chest.
- Lifting your hips and the lower tip of your sternum up as high as you can while keeping your thighs parallel and knee caps pointing skyward, carefully bring you head back in line with the arch of your spine, focusing on keeping the back of your neck long. Consider taking your neck and head into deeper extension if you can do that without pain. Stay for a few breaths or longer.
- To come out of the pose, lower your hips to the floor as you bring your head back to a vertical position. Release your hands, and consider wrist flossing after you do the pose a few times (see Featured Sequence Wrist Flossing).
First Variation: Prep Pose
- Follow steps 1-3 above, and hold the seated version for 15-30 seconds before releasing the chest lift.
- Return to Staff pose and release tension in your shoulders, neck and wrists as needed before attempting again.
- Follow steps 1-3 for the classic pose.
- Bend your knees and place your feet about 1.5 feet from your hips.
- Pressing down into your hands and feet equally, begin to lift your hips up about 6 inches off the floor and a bit towards your feet. Keep your chin tucked towards your chest.
- Press more firmly into your hands and feet and lift your hips and lower sternum up gradually towards a place where your front hips line up with your shoulders and knees, stopping anywhere shy of that mark if your body sends you a pain signal to do so.
- Once you are in the table-like position, gradually work with your neck as in the classic pose, focusing on keeping the back of your neck long. Consider taking your neck and head into deeper extension if you can do that without pain. Stay for a few breaths.
- To come out of the pose, lower your hips to the floor as you bring your head back to vertical. Release your wrists, shoulders and neck as needed. Repeat as desired.
Third Variation: Chair Upward Plank Pose
The chair version of Upward Plank provides a gentler front body opening, and is easier all around because it does not require as much upper body strength or shoulder flexibility (arm extension). Because your feet will likely be flat on the floor when you come up into the pose, your legs will do more of the work than the other variations and there will be less weight on your hands and wrists. This is a very good starting pose to try if your shoulders are tight.
- Place a chair with its back legs against the wall.
- Sit on the edge of the chair, facing away from the wall, with your legs together and your knees bent.
- Place your hands alongside your hips on the seat of the chair, close to the front edge of the seat.
- Extend your legs straight out in front of you, with your feet close together, your heels on the floor, and your feet slightly flexed.
- Press your hands into the chair as your lift your hips up and away from the chair and press the balls of your feet to the floor. Keep your head neutral for now. Ideally, when you are up in the pose, your shoulders should be over your wrists, so you may need to move your feet a bit further away from the chair as you come up.
- Look down the front of your body, and try to lift up your hips and chest so that your body at least makes a straight line from your feet to your collarbones. If you want to try taking your head and neck back into a backbend (extension), maintain as much length in the back of your neck as you can, go slowly, and make sure the change of position to does not cause you any pain.
- To come out of the pose, lower your hips back and down to the front edge of the chair seat.


