How Much Protein You Need and

Pro Bodybuilders eat about one gram (sometimes even 1.5 grams) of protein per pound of body weight or per pound of non-fat tissue. I'm sure you've seen that the recommended dail

Comments

Showing posts with label arm strength. Show all posts

Thursday, February 19, 2015

Building Upper Body Strength the Easy Way, Revisited

by Nina
In a post from a few of years back Building Upper Strength the Easy Way, I included a mini yoga practice for building upper body strength. In those days, we didn’t have the collection of photographs we have now (thank you, Melina Meza!) and we didn’t have as much information about the individual poses in that mini sequence that we have now.

So I thought today I would revisit that sequence and include photographs of the poses and links to their full descriptions when we have them. The reason this came up for me is that just yesterday I was practicing all these poses in my home practice. Yes, I work regularly on maintaining my upper body strength by doing some simple, accessible yoga poses. As I wrote in Building Upper Strength the Easy Way  you don’t have to do handstands or arm balances to build upper body strength. Any pose where you put weight on your arms builds upper body strength, including Cat/Cow pose, Downward-Facing Dog pose, Upward-Facing Dog pose, Plank pose, Side Plank pose, and Upward Plank pose. 

So I’d like to encourage everyone else to incorporate some of these simple poses into your home yoga practice. For most of these poses, there are modifications for people who have wrist problems, such as practicing with forearms on the floor or using a chair or wall instead of the floor.

Also, any pose where you hold your arms up or out to the side builds upper body strength, including Warrior 1, 2, and 3, Tree pose, Triangle pose, Extended Side Angle pose, Half Moon pose, and so on. Do you doubt me? Try keeping your arms in position instead of releasing them as you change from the first side to the second side of Warrior 2 (or any other pose). I bet you’ll find it’s harder than you expected.

And if you decide to practice this mini sequence in its entirety, feel free to rest between the poses.

Mini Upper Body Strengthening Sequence

1. Cat/Cow Pose (Cakravakasana), 6 rounds. 
If kneeling isn’t possible or you have wrist problems, you can do this pose in a chair (see Featured Pose: Seated Cat/Cow).

Start in Hands and Knees position with padded under your knees if needed. Start with your spine in a neutral position. 
On your inhalation, start moving from your pelvis, tipping your hips downward toward the floor. As you continue to inhale, gently lift and lengthen your spine into a gentle backbend. Lift your breastbone forward and up, and allow your head and neck to lengthen out and back, coming into the Cow backbend.
On your exhalation, start by releasing your pelvis in the opposite direction, moving the back of your waist upward toward the ceiling. As you continue to exhale, allow your middle back to arch up towards the ceiling and release your chin toward your chest, coming into the Cat forward bend.
2. Downward-Facing Dog (Adho Mukha Svanasana) pose, 30 seconds to 2 minutes.
See Featured Pose: Downward-Facing Dog for instructions. If you have wrist problems, you can practice this pose on your forearms, either with parallel forearms or with hands clasped into a Headstand position.
3. Standing Forward Bend (Uttanasana), 30 seconds to 1 minute.
4. Sun Salutation, 2 rounds, or Downward-Facing Dog to Plank Pose.
My original sequence included Sun Salutations. But I'm thinking now that you might like to keep it even simpler and just practice moving from Downward-Facing Dog into Plank pose and back. You could hold the Plank pose for an extended period of time or you could do the poses dynamically, move in and out of Plank with your breath. See Featured Sequence: Upper Body Strength for information on how to practice Plank pose. People with wrist problems could do the forearm version.
If you want to do Sun Salutations for this sequence, practice Plank pose instead of Pushup Pose and High Lunge instead of jumping. This is not only easier but is safer for most of us because frankly after a certain age, Pushup pose (Chaturanga Dandasana) is quite stressful for the shoulders and jumping around is hard on the knees.

Also, to be honest, I do my Sun Salutations differently than Baxter does. You can see his instructions in his post Featured Sequence: Agility Practice. My version focuses more on upper body strength as it includes both Plank pose and Upward-Facing Dog pose. Baxter’s is milder, as includes Cobra instead of Plank and Upward-Facing Dog. You should do whichever works best for you. 

Here is the sequence of pose I include in my Sun Salutations. I’m not going to give instructions today, just the order of the poses. Don’t worry about moving quickly with your inhalations and exhalations. It’s fine to take a breath or two in each pose, or even stay longer in the arm strengthening poses. 
  1. Mountain pose (Tadasana)
  2. Arms Overhead pose (Urdva Hastasana)
  3. Standing Forward Bend (Uttanasana) 
  4. Extended Standing Forward Bend (Uttanasana with extended rather than rounded spine)
  5. High Lunge (Vanarasana), right side
  6. Downward-Facing Dog pose (Adho Mukha Svanasana)
  7. Plank pose
  8. Upward-Facing Dog pose (Urdva Mukha Svanasana)
  9. Downward-Facing Dog pose (Adho Mukha Svanasana)
  10. High Lunge (Vanarasana), left side
  11. Extended Standing Forward Bend (Uttanasana with extended rather than rounded spine)
  12. Standing Forward Bend (Uttanasana)
  13. Powerful pose (Utkatasana)
  14. Arms Overhead pose (Urdva Hastasana)
  15. Mountain pose (Tadasana)
For the second round, step your right foot back into the first High Lunge and right foot forward into the second High Lunge.

5. Sideways Plank Pose (Vasithsasana), 30 seconds to 1 minute per side.
See Featured Pose: Side Plank Pose for information. People with wrist problems can practice with the forearm on the floor.
 People who want to build up the strength to do the full pose can do the wall version.
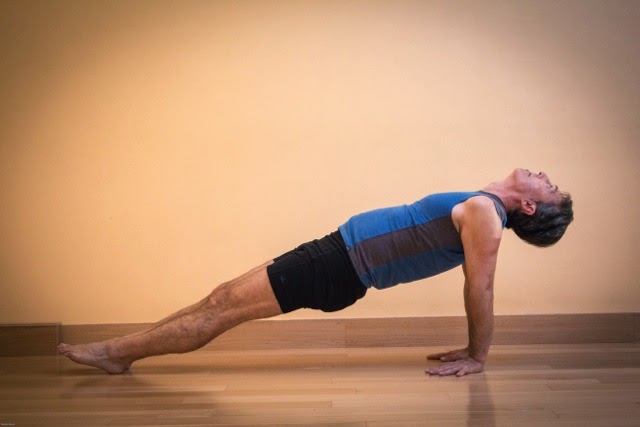
6. Upward Plank Pose (Purvottanasana), 30 seconds to one minute.
See Featured Pose: Upward Plank Pose for information. People with wrist problems can try the chair version, where you bear less weight on your hands.
Repeat the pose two times. Rest in Constructive Rest pose in between. 

7. Child's Pose (Balasana), 1 to 2 minutes.
Take the classic pose, with your arms by your sides, rather than stretched out in front of you. Relax and rest your arms and upper body before moving on to Relaxation pose.

Subscribe to Yoga for Healthy Aging by Email ° Follow Yoga for Healthy Aging on Facebook ° Join this site with Google Friend Connect

Monday, February 2, 2015

Featured Pose: Side Plank Pose, Standing Version

by Nina
We’ve mentioned the “wall version” of Side Plank pose (Vasithasana) several times on this blog (see Featured Sequence: Upper Body Strength), and although we tried to describe the pose as clearly as possible, many people requested photos of the pose because they had a hard time imagining it because they had never seen it before. Now I’m excited to tell you that we finally do have photos of this pose, including two variations.

This version of Side Plank pose is wonderful for starting your journey toward the classic version. Because you stand on the floor, you bear much less weight on your arm, so you can gradually build up the strength needed for the floor version. It also makes the pose accessible to people who can’t get up and down from the floor or people who are recovering from a shoulder injury and need to take things gradually. Finally, Donald Moyer, my teacher, often uses this pose as a warm-up for the classic version.

Instructions:

1. Start by standing with your right side to the wall, close enough so you will be able to easily place the palm of your right hand on the wall.

2. Reach your right arm out to your side, parallel with the floor, and place your palm flat on the wall with your fingers pointing up. Engage your right shoulder blade into your chest wall and down slightly towards your waist. 

3. Step both feet out away from the wall until your right foot is positioned directly under your left shoulder, with your left foot next to your right foot. Don’t be timid about taking this stance—you should be standing at an angle at this point, with some of your weight now being supported by your hand on the wall. Since this is an unusual position to take, use your eyes to check that you really do have your right foot under your left shoulder.

4. Bring your left arm out to the side. This is the first phase of the pose, and if this is strenuous enough for you, you can stop here. Stay for six breaths and work up to longer holds.
5. If your balance is good and you want to try a variation where you bear a little more weight on your hand, bend your left knee and bringing your left foot into Tree pose position.

6. Then bring your left arm up, overhead, and alongside your ear, like the top arm in Extended Side Angle pose. Then reach your left arm and shoulder blade strongly towards the wall. Stay for six breaths and work up to longer holds.
To repeat the pose on the second side, turn around so your left side is facing the wall.

Subscribe to Yoga for Healthy Aging by Email ° Follow Yoga for Healthy Aging on Facebook ° Join this site with Google Friend Connect
Tuesday, January 20, 2015

Featured Pose: Upward Plank Pose (Purvottanasana)

by Baxter
This pose is unique in a couple of ways. First, it lengthens the front of your body, (referred to as the “east” side in yoga, since it would face the rising sun if you were doing Sun Salutations) from the toes to the head. It does that by lifting your front body away from the floor into a gradual backbend shape and so also strengthens your back body in a different way than other back bends, such as Camel pose (Ustrasana), which is much more passive in the use of the back muscles to create the pose shape then Upward Plank is). And second, it is one of the few poses that takes your arms into deep extension, a movement that is useful as preparation for Shoulderstand, another pose that requires similar action at the shoulder joint.

Nina recommends this pose for arm and upper body strengthening, and finds it is a good counter-pose for twists and seated forward bends as it is a mild backbend shape that helps restore the natural curves of your spine.

Baxter prescribes this pose for:
  • general inactivity
  • prolonged sitting
  • head forward syndrome
  • upper body weakness
  • tight shoulders

Note that although these days this pose is commonly Upward Plank pose, the name "Purvottanasana" translates as Intense Stretch of the East, referring to the wonderful overall front-body stretch that the pose provides.

    Cautions: Because you bear your body weight on your wrists and hands in the extended position, those with wrist problems, including wrist pains, sprains, and strains, and carpel tunnel syndrome, should use caution in doing this pose. You may need to modify your hand position, use a wedge, or lower onto your elbows to do the pose safely. Try the chair version as a gentler alternative.

    Due to the deep extension at the shoulder joint, those with shoulder joint pain or tendonitis or tendency to dislocate in this direction should use caution and stick to the sitting prep position shown below.

    As with any pose that drops your head back into a backbend (extension) with the additional pull of gravity at work, those of you with neck issues, especially degenerative discs and facet joint arthritis, should consider keeping your chin tucked to your chest when doing the pose.

    Classic Version
    1. Sit in Staff Pose (Dandasana), with your legs straight out in front of you’re your spine erect over your hips, and your hands on the floor at your sides. 
    2. Move your hands about 6-12 inches back behind your hips, with your palms flat on floor. You can have the hands pointing forward (classic position) or turned out to sides or back if that is better for your wrists. 
    3. Firm your palms down, lengthen through your elbows, and then lift your sternum forward and up to bring your chest into a bit of backbend, while keep your chin and head in neutral position (see Prep Pose photo below). 
    4. Push down through your arms and pivot on your heels as you lift your hips up and forward, pressing the balls of your feet forward and down toward the floor (don’t worry if the balls of your feet does not make it all the way down). Keep your chin tucked to your chest.
    5. Lifting your hips and the lower tip of your sternum up as high as you can while keeping your thighs parallel and knee caps pointing skyward, carefully bring you head back in line with the arch of your spine, focusing on keeping the back of your neck long. Consider taking your neck and head into deeper extension if you can do that without pain. Stay for a few breaths or longer. 
    6. To come out of the pose, lower your hips to the floor as you bring your head back to a vertical position. Release your hands, and consider wrist flossing after you do the pose a few times (see Featured Sequence Wrist Flossing).
    Timing: To warm your body up, you can do this pose dynamically, lifting up with your inhalation and lowering down with your exhalation for a few rounds (I usually do six rounds. Then do the pose statically, starting off holding it for 15-30 seconds, and gradually working towards 1-2 minutes over the course of weeks or months.

    First Variation: Prep Pose
    This version is for those with wrist, shoulder and neck issues, as it allows you to take the basic shape of the pose without causing strain to areas that need protection.
    1. Follow steps 1-3 above, and hold the seated version for 15-30 seconds before releasing the chest lift.
    2. Return to Staff pose and release tension in your shoulders, neck and wrists as needed before attempting again.
    Second Variation: Reverse Table Pose 
    This variation is for those who may want to work on increasing shoulder flexibility (arm extension), as it requires more than the classic pose. It also is less of a back bend, so those of you who have difficulty doing backbends may find it a good starting position as you head towards the classic pose.
    1. Follow steps 1-3 for the classic pose.
    2. Bend your knees and place your feet about 1.5 feet from your hips. 
    3. Pressing down into your hands and feet equally, begin to lift your hips up about 6 inches off the floor and a bit towards your feet. Keep your chin tucked towards your chest.
    4. Press more firmly into your hands and feet and lift your hips and lower sternum up gradually towards a place where your front hips line up with your shoulders and knees, stopping anywhere shy of that mark if your body sends you a pain signal to do so.
    5. Once you are in the table-like position, gradually work with your neck as in the classic pose, focusing on keeping the back of your neck long. Consider taking your neck and head into deeper extension if you can do that without pain. Stay for a few breaths.
    6. To come out of the pose, lower your hips to the floor as you bring your head back to vertical. Release your wrists, shoulders and neck as needed. Repeat as desired.
     Timing: Same as the classic pose above. 

    Third Variation: Chair Upward Plank Pose 

    The chair version of Upward Plank provides a gentler front body opening, and is easier all around because it does not require as much upper body strength or shoulder flexibility (arm extension). Because your feet will likely be flat on the floor when you come up into the pose, your legs will do more of the work than the other variations and there will be less weight on your hands and wrists. This is a very good starting pose to try if your shoulders are tight.
    1. Place a chair with its back legs against the wall.
    2. Sit on the edge of the chair, facing away from the wall, with your legs together and your knees bent.
    3. Place your hands alongside your hips on the seat of the chair, close to the front edge of the seat.
    4. Extend your legs straight out in front of you, with your feet close together, your heels on the floor, and your feet slightly flexed.
    5. Press your hands into the chair as your lift your hips up and away from the chair and press the balls of your feet to the floor. Keep your head neutral for now. Ideally, when you are up in the pose, your shoulders should be over your wrists, so you may need to move your feet a bit further away from the chair as you come up.
    6. Look down the front of your body, and try to lift up your hips and chest so that your body at least makes a straight line from your feet to your collarbones. If you want to try taking your head and neck back into a backbend (extension), maintain as much length in the back of your neck as you can, go slowly, and make sure the change of position to does not cause you any pain.
    7. To come out of the pose, lower your hips back and down to the front edge of the chair seat.
    Subscribe to Yoga for Healthy Aging by Email ° Follow Yoga for Healthy Aging on Facebook ° Join this site with Google Friend Connect

    Thursday, September 27, 2012

    Featured Pose: Warrior 1 for Upper Body Strength

    by Baxter and Nina
    Warrior 1 is the second pose in our upper body strengthening series because, like Warrior 2, Warrior 1 is an accessible pose that is very strengthening for your arms and upper body. Even though you don’t bear weight on your hands or arms, the Warrior 1 arm position entails resisting gravity. Because the arm position is different than Warrior 2, this pose strengthens different muscles, including those that raise your arms forward and up overhead, and all of the small muscles inside the joint that help you stabilize your arms in that position. In addition, because you are taking your arms through the range of motion in forward flexion (forward and up), this pose also helps increase flexibility in the shoulder joint.

    Furthermore, as your upper back and chest move into a slight backbend (extension) in Warrior 1, your back muscles are also strengthened, including the muscles around your shoulder blades, your trapezius and serratus anterior, and all the muscles that line your back spine. These are important muscles for keeping your spine healthy and for maintaining good posture. Good posture is essential for healthy aging because it helps keep your spine healthy, supports your respiratory system, and keeps you more mobile.

    This pose is accessible even if you have something going on in your shoulders that is challenging because you can control how far you raise your arms. You don’t need to bear weight on your hands, so if you have wrist or hand problems still can do it. And, of course, an added benefit is the pose is very strengthening for the legs as well as the upper body!

    Warrior 1 can be challenging to hold (and balance in) for long periods of time, so if you’d like to focus on your upper body rather than your lower body, you can work with your back heel against the wall or try having your feet slightly closer together.

    Because we’re focusing on upper body strength for next several weeks, we’re going to give you three different ways to strengthen your body with Warrior 1. Version 1 is the traditional pose, and Versions 2 and 3 use props to help strengthen different muscles in your arms, shoulders and upper body..

    Instructions: Starting in Tadasana, step your feet about three feet apart and place your hands on your hips. Spin your right foot out 90 degrees. Then lift your back heel, pivot on the ball of your foot, and spin your back heel back about four or five inches. Next, rotate your hips and chest in the same as your right foot. Don’t force your hips to square with the wall you are facing. Instead, allow your left hip to turn slightly toward your back leg, but square your head and your torso ,from the navel on up,  with your front foot. Maintain a straight strong back leg throughout.

    Now, release your arms to your sides and turn your palms to face each other. Keeping your palms facing each other, inhale your arms forward and up. If your shoulders are tight, don’t worry about your arms being exactly vertical. But do keep your arms parallel—don’t try to bring your hands together. On your next exhale, bend your front knee so it is directly over your ankle joint. Do not lean forward or back, but keep your torso directly over your pelvis.
    As you breathe in the pose, encourage your outer shoulder blades to lift with your arms, while keeping the upper inner corners of your shoulder blade moving down your back (so the sides of your neck are relaxed and long). Keep your arms active and bring your awareness to your elbows, making sure they are not bent, and reach through both sides of your elbow joints. Stay in the pose for 30 seconds and gradually work up to longer periods of time.

    To come out of the pose, inhale and straighten your front leg. Then exhale and release your arms to your sides. Pivoting on the balls of your feet, bring your feet back to neutral as your turn your head and torso to face the long end of your mat.

    As you come up, check your back, neck and shoulders for any pain. If you experience pain, reduce the time or change the foot position or not force your arms as high or keep them in a V position if your shoulders are good. Preparing for the other side.

    Version 2: With a Block


    This version activates the muscles on the inner edges of your arms and increases the activity of your pectoralis muscles so you strengthen more muscles than when you do the pose without the block. Start with the lightest block or prop you have. When pose becomes easier with practice, you can use a heavier prop.
    Start by holding the block and follow the instructions for the traditional version of Warrior 1. Before you raise your arms forward and up, place the block between your hands on the widest side. Keeping your arms straight, press firmly into the block with your hands without bending your wrists or hands. As you inhale, take your arms forward and over head, and as you exhale, bend the front knee. If you have tight shoulders you may not be able to bring your arms to vertical, so take them to a comfortable height.

    Version 3: With a Strap

    This version activates the muscles on the outer surfaces of yours arms and some of your side chest muscles that get extra strengthening.
    Before you begin, make a loop with your strap that is sized so when put your arms through and  push your arms against the strap, your arms are kept parallel. Place the strap about two inches below your elbows on the fat part of your forearms (you’ll may have to experiment to find the right position for your head). Note from Nina: yes, yes, I realize the photograph shows the strap just above the elbows, but that seems to work for Baxter. I definitely need the strap higher toward my hands, as otherwise my head gets trapped.

    Follow the instructions for the traditional version of Warrior 1. As you raise your arms forward and up, press outward against the strap on your arms as you also focus your awareness on keeping your elbows straight.

    Cautions: If you have high blood pressure or cardiovascular problems, we recommend that you do not to stay in the pose for long periods of time. Try doing the pose dynamically instead, moving in and out of the pose with your breath (see Warrior 1 and Warrior 2 Dynamic Vinyasas), which will still strengthen your arms and upper body. When you use the block or strap, honor any sensations of pain in your shoulder joint. Keep the sides of your neck relaxed, and modify your arm position to see if that makes the pain subside. If pain persists, come out of the pose, and ask a teacher to check your alignment.

    Subscribe to YOGA FOR HEALTHY AGING by Email ° Follow Yoga for Healthy Aging on Facebook 

    Thursday, September 20, 2012

    Featured Pose: Warrior 2 for Upper Body Strength

    by Baxter and Nina

    Warrior 2 is the first pose in our upper body strengthening series because it is a very easy and accessible pose that is very strengthening for your arms and upper body. Even though you don’t bear weight on your hands or arms, the arm position entails resisting gravity. This strengthens the muscles that lift your arms to your sides and all of the small muscles inside the joint that help you stabilize your arms at the shoulder joint, including the deltoid and supraspinatus, which are important for maintaining the health of those joints. In addition the pose provides equal strengthening of both your upper back, around the shoulder blades, and your chest, around the collar bones, as you build strength in your upper trapezius. And of course an added benefit is that this  pose is very strengthening for the legs as well as the upper body!

    This pose is accessible even if you have something going on in your shoulders that is challenging because it doesn’t require full range of motion in the shoulder joints. And you don’t need to bear weight on your hands, so if you have wrist or hand problems you can still can do the pose.

    Because we’re focusing on upper body strength for next several weeks, we’re going to give you three different ways to strengthen your body with Warrior 2. Version 1 is the traditional pose, and Versions 2 and 3 use a slightly different arm position.

    Instructions: Starting in Tadasana, step your feet wide apart. Turn your right foot out 90 degrees, then, pivoting on the ball of your back foot, shift your left heel back an inch or two to your left so the foot is slightly turned in.

    Next, inhale and raise your arms up so they are parallel to the floor, with your palms facing down toward the floor. Keep your shoulder blades relaxed and moving down your back (not sliding up toward your ears) as you raise your arms. Then, on an exhalation, bend your right knee directly over your right ankle while keeping your torso centered over your pelvis (not leaning over your front leg). Allow your hips to rotate slightly toward your right knee but rotate your chest away from your right knee so your chest faces directly forward. Finally, allow your head and neck to turn so you gaze over your right hand.
    Once you are in the pose, use your eyes to check both arms to make sure they are in an even line with the tops of your shoulders, that they are neither too high or low, and that they are parallel with the floor.
    Because your purpose in doing Warrior 2 this time is to develop strength in your upper body, you should keep your arms out to your sides for a decent amount of time. Start with 30 seconds and work your way up to 1 to 2 minutes over time, gradually building up endurance. Of course if you’re very fatigued or shaking, come out earlier. Notice that the longer you hold your arms up, the more you unconsciously will slide your shoulder blades up toward your ears. If this happens, consciously move relax your shoulder blades back down your back.

    To come out of the pose, exhale and release your arms. Then straight your knee, turn your feet to a parallel position, and switch to the other side:

    Version 2: Palms turned up


    Because of the external rotation in your shoulder joint required to turn your palms up, this variation allows you to strengthen areas that aren’t strengthened with the first version With your palms up you activate a different portion of your deltoid muscles (front portion) and other muscles deeper in your shoulder joint. You could do Version 2 of the pose immediately after doing Version 1 or you could alternate different arm positions on different days. activates a different portion of your deltoid muscles and activates other muscles deeper in the shoulder joint.

    For this version, follow the instructions for Version 1. When it comes time to raise your arms, start by spinning from your upper arms to turn your palms to face front. Then as your raise your arms, keep spinning form your upper arms to turn your palms up toward the ceiling.

    Version 3: Holding blocks
    This version strengthens the same muscles as version 2, but provides increased strength building because you are holding a weight. You can use yoga blocks, same-weight books, or even bags of rice or beans. However, we recommend building up your strength practicing Versions 1 and 2 before trying Versions 3. We also recommend that you start off with lightest weight possible, such as foam blocks, and work up to heavier weights over time, such as cork or wooden blocks.

    For this version, start by holding the props and then follow the instructions for Version 1. As you lift your arms, rotate your upper arm bones so as you arms come out to the sides, the blocks are resting on your upturned palms.

    Because of the additional weight, you may feel the additional work, and you may need to reduce the time you stay in the pose! If you become fatigued or shaky, release your arms. Gradually, over time, increase your time in the pose to up to 2 minutes.

    Cautions: In general, Warrior 2 is a very safe pose. However, if you experience pain in your shoulder joints or neck, come out of the pose and get some advice from a yoga teacher about your alignment. If you have a history of rotator cuff injury or dislocated shoulder, approach the pose carefully, especially Version 3.

    Subscribe to YOGA FOR HEALTHY AGING by Email ° Follow Yoga for Healthy Aging on Facebook 


    Thursday, December 1, 2011

    Featured Pose: Locust (Dynamic Version)

    by Baxter and Nina

    Locust pose (Salabasana) is a simple backbend that strengthens the entire backside of your body, from the nape of your neck to the backs of your heels. Baxter loves this pose because it’s helpful for such a wide range of problems, including lower back pain, postural problems, and weakness anywhere along the chain of your back body, including your , including hips and hamstrings. And because the backbend is shallow and doesn’t put pressure on the wrists, it is accessible to almost everyone.

    We’re recommending two versions of this pose: one with your hands on the floor and the other with your arms parallel to floor and hands lifted. The version with your hands on the floor provides more support, making the pose less demanding. The version with arms raised increases the amount of strengthening in your arms and shoulders.

    Baxter prescribes this pose for:

    • lower back pain (it strengthens the muscles along the sides of your lower back)
    • hamstring injuries
    • arthritis of the knees (it strengthens the leg muscles)
    • postural problems (such as excessive rounding and head-forward syndrome)
    • arm strength (in the version where you lift your arms)
    • depression (accessible even when your energy is low)
    • general weakness

    Instructions: Lie on your belly, with your head resting on the floor, your arms resting at your sides, hands palm down, and your legs stretched evenly back behind you, toes gently pointed. If your lower back feels vulnerable, press your hips gently down to the floor.
    Think about your right leg being a bit longer then your left, and on an inhale, lift your right leg up a few inches off the floor without bending your knee knee, while also lifting your head and chest up a few inches. As you lift your chest and head, be careful not to overextend your neck (throwing it back) because this could cause neck strain. If you wish, raise your arms and hands so your arms are parallel to the floor and your palms are facing the floor.


    Exhale and release back to the starting position. Repeat the process with your left leg.

    Alternate right and left with every round of breath. Do about six times, side to side. Then rest.
    Cautions: As with any pose, Locust might aggravate an existing problem or condition. In particular, if you have a pronounced lumbar curve, your back problems could be aggravated. Consult your favorite teacher for an alternative is you have any trouble. If you have asthma or any other breathing difficulties, this pose might make you short of breath. If this happens, come out of the pose and rest.

    Subscribe to YOGA FOR HEALTHY AGING by Email ° Follow Yoga for Healthy Aging on Facebook 


    Arthritis, Exercise and Yoga

    by Nina

    Hey, I heard this really nice little piece on arthritis and exercise on NPR that I wanted to share with you. Fortunately, NPR has both the audio and a transcript of the piece on their web site (see here). What I liked so much about this particular piece was how simple and clear it was about why it is important to continue to exercise when you have arthritis (even though most people don't) because exercising, while it cannot reverse arthritis, is the only way to prevent the arthritis from getting worse. Here's why:

    1. Arthritis breaks down your cartilage, the natural shock absorbers in your joints. As a result, blood doesn't circulate as freely and doesn't deliver adequate nutrition to your cartilage. Exercise massages the joints, improving the blood supply to the joints, providing your cartilage with more nutrition.

    2. The stronger the muscles are around the joint, the more protection your body can provide for the joint. Your muscles take up the weight and pressure, instead of the joint itself.

    The end of the piece even mentions yoga as a good way to improve the strength of the muscles around your joints! (That's refreshing because most people are under the misconception that yoga is only about stretching.) But yoga is also a good way to massage your joints to get the blood flowing because in a well-rounded practice you move your joints in every direction. Just think of all the directions in which your hip joints move in the various standing poses. And your knee joints are bent or straight, turning out to the side or even turning in slightly (such as in Eagle pose). Your shoulder joints really get a workout, too, as you hold your arms overhead, out to the side, behind your back, or across your body (again, as in Eagle pose).

    For strength building, it's easy to think of standing poses (especially those with bent knees) and balancing poses that strengthen the muscles around the knees and hips. But what about your shoulder joints? Downward-Facing Dog and Plank pose spring immediately to mind because you are bearing weight on your arms as they extend forward. But there are also other poses that you can use to strengthen your shoulder joints in which you bear weight on your arms reaching sideways (such as Vashistasana, sometimes called Sideways Plan pose) or behind you (such as the backbend Purvottanasana, sometimes called Upward Plank pose). Here's Esther doing Purvottanasana:


    That looks like it does a good job strengthening the hip joints, too! Yeah, it can definitely be a challenge to practice with pain in your joints or to practice modified versions of poses you used to be able to do without props (I know because I have mild arthritis in one of my hip joints), but enjoying more mobility in your daily life and possibly avoiding joint replacement surgery, well, that's a pretty big payoff.

    Monday, November 21, 2011

    Featured Pose: Hunting Dog


    by Baxter and Nina
    This week’s featured pose is one of Baxter’s favorite poses for lower back pain. Hunting Dog pose, which is a great precursor to strong poses like Warrior 3, is a wonderful way to tone and strengthen your upper body, especially the serratus anterior muscles, as well your pelvic stabilizers and core belly muscles. It’s also a good pose for anyone trying to improve core strength as well as strengthening the lower back. Baxter prescribes this pose for:

    • lower back pain
    • balance issues
    • fatigue (when standing poses are too tiring)
    • improving right/left coordination
    • building arm strength
    General Instructions: Start by placing a folded blanket on the floor. Then come into a hands-and-knees position, with your knees on the blanket and your hands on the floor or yoga mat. Keep a neutral curve in your lower back and strong arms.
    Next, slowly take your right leg back behind you into a lunge position, with your toes turned under and the ball of your foot on floor. Try to keep your pelvis area and lower back in the starting neutral position at all times—no tip, tuck or turn. 
    If you are feeling stable, lift your right leg up until it is about parallel with the floor, but no higher. Again, no change to pelvic alignment!
    Finally, consider reaching your arm forward parallel to the floor.
    Hold the position for at least 6 breaths, and up to 16 breaths. When you release, shake out your left hand and wrist.  Repeat on the second side.

    Cautions: If you are having lower back pain, keep the toes of your straight leg on the ground rather than lifting your leg. If you have wrist pain, bend your elbows and rest your forearms on blocks, rather than putting weight on your hands.

    Subscribe to YOGA FOR HEALTHY AGING by Email ° Follow Yoga for Healthy Aging on Facebook